This post looks at how to configure ASP.NET Core middleware in a way that allows you to have different middleware for different types of request. There are many use-cases for this but one common example for this requirement is a project with both MVC and API actions where you want to error handling to be different for each.
A middleware primer
Middleware is simply the pipeline for handling web requests in ASP.NET Core. All ASP.NET Core applications need a minimum of one piece of middleware to respond to requests and your applications are effectively just a collection of middleware. Even the MVC pipeline itself is middleware.
Each middleware component has an Invoke method with an HttpContext argument. You can use this argument to handle the request and generate a response if applicable:
public async Task Invoke(HttpContext context)
{
    if (context.Request.Path...)
    {
        await context.Response.WriteAsync("writing text...");
    }
}
Optionally, you can add other arguments to your Invoke method and these dependencies will be resolved on each request using the baked in dependency injection support (these dependencies would need to be registered in ConfigureServices):
public async Task Invoke(HttpContext context, MyOtherDependency blah)
{
    if (blah.DoSomething(context))
    {
        ...
    }
}
Middleware Execution
We'll learn how to configure the middleware pipeline in the next section but it is important to be aware that the order of registration determines the order of execution.
The top-most piece of middleware in your application will always get called for each request. This is done automatically by the framework. This middleware may send a response to the client (terminating the pipeline), or it may call the next piece of middleware. For the latter option, it of course needs access to the next middleware component.
This is why most middleware components are defined with a constructor that takes a RequestDelegate argument.
public class MyMiddleware
{
    private readonly RequestDelegate _next;

    public MyMiddleware(RequestDelegate next, OtherDependencies...)
    {
        _next = next;
    }
}
The RequestDelegate is populated automatically and gives you a reference to the next piece of middleware in the pipeline. We typically store the RequestDelegate so we can call it from the Invoke method which is where the middleware does its work.
The Ins and Outs of Invoke
If we look at the typical structure of a middleware's Invoke method, we see something interesting:
public async Task Invoke(HttpContext context)
{
    // code executed before the next middleware
    ...
    await _next.Invoke(context); // call next middleware

    // code executed after the next middleware
    ...
}
Each piece of middleware has two chances to do some work - once before the next middleware is called (the in phase) and once after (the out phase).
It is also important to realise that a middleware component does not have to call the next middleware component in all cases. As an example, you may have some middleware checking for an API key and if the key is not present then you may wish to write a response directly and short-circuit the rest of the pipeline. After all, there is probably not a need to execute your secure controller actions if the user is unauthenticated.
When writing middleware, you typically either call the next middleware component or you write a response. Rarely or ever should you do both.
You can find out more about middleware in the ASP.Net Core docs
Registering middleware with Use*
Middleware is registered in the Configure method of Startup.cs. The Configure method has an IApplicationBuilder argument that (via several extension methods) provides the methods necessary for all types of middleware registration.
The standard way to register middleware that applies to all requests is with UseMiddleware:
public void Configure(IApplicationBuilder app, ...)
{
    app.UseMiddleware<MyCustomMiddleware>();
}
In reality, you rarely need to call UseMiddleware directly because the standard approach for middleware authors is to write extension methods specific to the middleware being registered:
public void Configure(IApplicationBuilder app, ...)
{
    app.UseMyCustomMiddleware();
}
Behind the scenes, the extension method normally just registers the middleware with UseMiddleware:
public static class MyCustomMiddlewareExtensions
{
    public static IApplicationBuilder UseMyCustomMiddleware(this IApplicationBuilder app)
    {
        app.UseMiddleware<MyCustomMiddleware>();

        return app;
    }
}
In our example, using the custom extension method is only slightly more readable and easier to use than the original UseMiddleware approach but this is only because our middleware is so simple. Most real-world middleware allows some configuration and custom extensions methods can provide a much nicer programming model than the params object[] args approach used by UseMiddleware.
Use* extensions methods are the standard way to register middleware applicable to all requests. In the next section, we'll look at situations where you want to have a different middleware pipeline for certain requests.
Middleware branching with MapWhen
MapWhen allows you to split the middleware pipeline into two completely separate branches by specifying a predicate:
app.UseMiddlewareOne();

app.MapWhen(context => context.Request.Path.StartsWithSegments("/api"), appBuilder =>
{
    appBuilder.UseMiddlewareTwo();
});

app.UseMiddlewareThree();
In this example, middleware One will always execute. Assuming no short-circuiting (see above), if the request path start with '/api' then middleware Two will execute. Otherwise, middleware Three will execute. With this configuration, there is no way for both middleware Two and middleware Three to execute for a single request.
I tend not to use MapWhen very often but as a usage example, we can restrict the StaticFiles middleware from running for all requests and instead specify a certain path:
app.MapWhen(context => context.Request.Path.Value.StartsWithSegments("/assets"),
    appBuilder => appBuilder.UseStaticFiles());
This would result in the static files middleware only running for request paths starting with '/assets' (where we store our static files). Any request with a path not matching this criteria would not run the StaticFiles middleware and the next registered middleware would run directly instead (perhaps saving valuable nano-seconds!).
Conditional middleware with UseWhen
The final case I want to look at is when you want most of your middleware to run for all requests but you have some conditional pieces - specific middleware that should only run for certain requests.
This is easily achieved with UseWhen which also uses a predicate to determine if the middleware should run:
app.UseWhen(context => context.Request.Path.StartsWithSegments("/api"), appBuilder =>
{
    appBuilder.UseStatusCodePagesWithReExecute("/apierror/{0}");

    appBuilder.UseExceptionHandler("/apierror/500");
});
This code uses different error handling middleware when the request is for the API (determined using the URL). The predicate approach provides a lot of flexibility and you can conditionally apply middleware based on cookies, headers, current user and much more.
As with MapWhen, all middleware registered before the UseWhen call will apply to all requests.
The primary difference between UseWhen and MapWhen is how later (i.e. registered below) middleware is executed. Unlike MapWhen, UseWhen continues to execute later middleware regardless of whether the UseWhen predicate was true or false.
Let's change our example to use UseWhen:
app.UseMiddlewareOne();

app.UseWhen(context => context.Request.Path.StartsWithSegments("/api"), appBuilder =>
{
    appBuilder.UseMiddlewareTwo();
});

app.UseMiddlewareThree();
This time, assuming no short-circuiting, middleware One and Three will be executed in all cases. Middleware Two will only be executed if the request path starts with '/api'.
UseWhen is very powerful and incredibly useful. Rather than the middleware itself deciding on if it should execute (perhaps via configuration), we can control middleware ourselves by choosing how we register it.
Here are a few examples:
- Restrict output caching to anonymous users.
- Add diagnostic headers for a certain IP subnet
- Handle errors differently for API and MVC actions
- Restrict certain requests from analytics
Conclusion
This post looked at the different options for configuring ASP.NET Core middleware in startup.cs. We showed the standard way to register middleware which results in the middleware executing for every request. We then described two other approaches which allows you to customise which pieces of middleware run for each request. Much of the time, you will use the standard approach of registering the middleware for all requests but it is very useful to know that alternatives exist for special situations.


 聊聊 asp.net core 认证和授权
2022-09-06
聊聊 asp.net core 认证和授权
2022-09-06
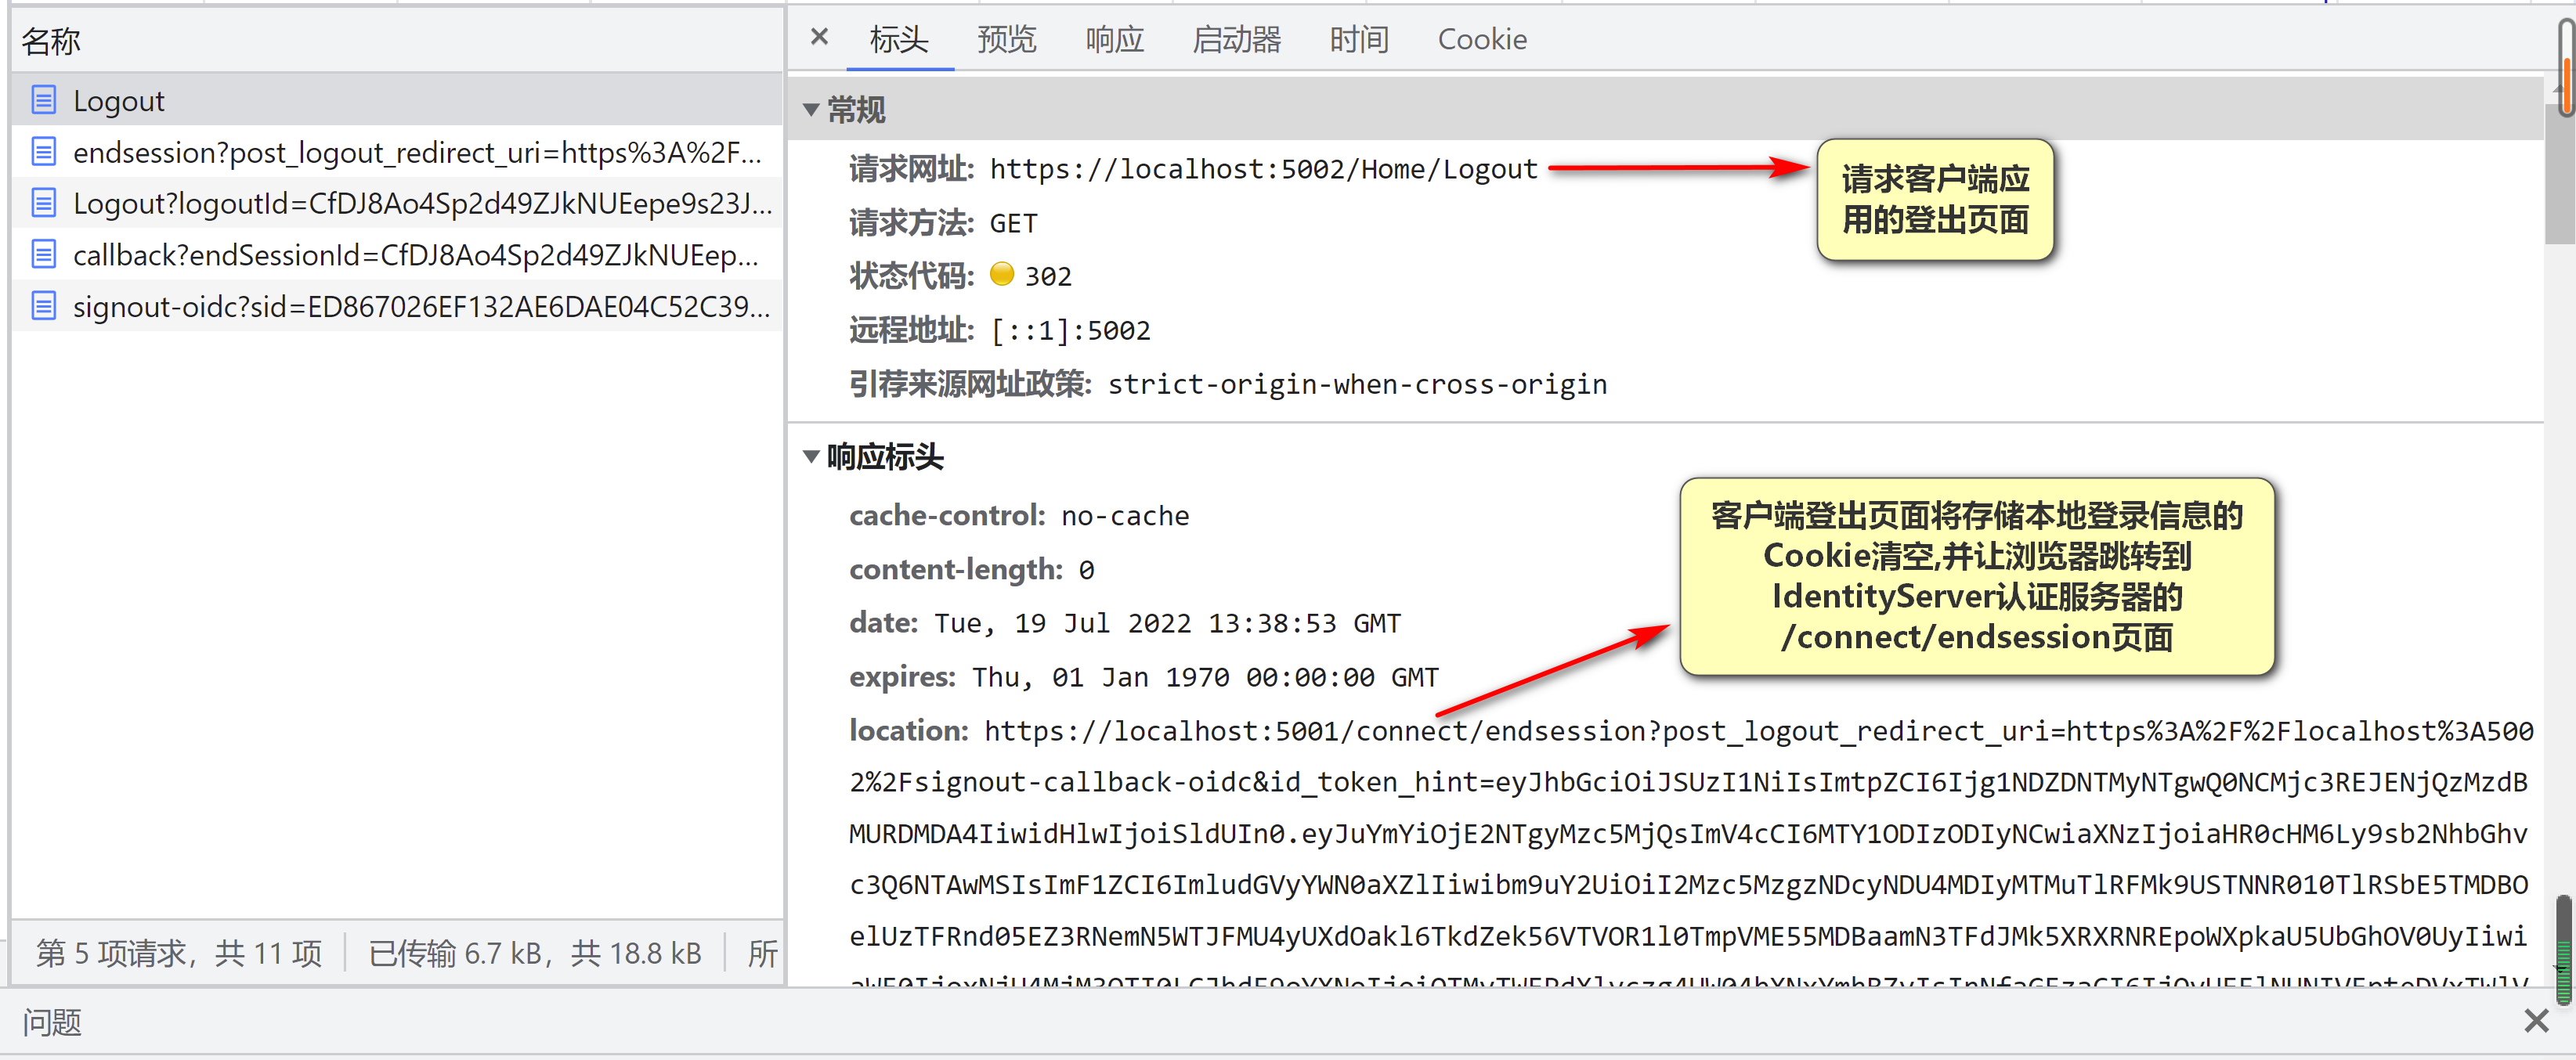 IdentityServer4 单点登出实现
2022-07-26
IdentityServer4 单点登出实现
2022-07-26
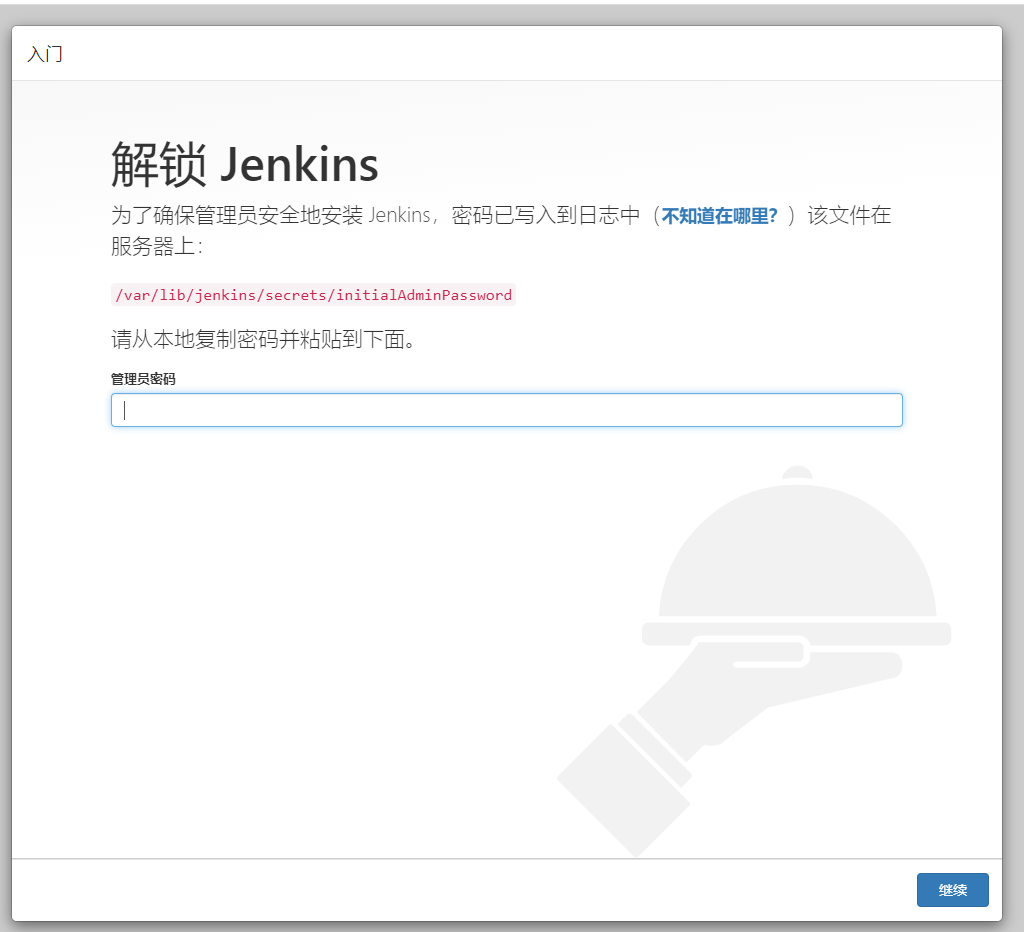 asp.net core + jenkins 实现自动化发布
2022-04-08
asp.net core + jenkins 实现自动化发布
2022-04-08
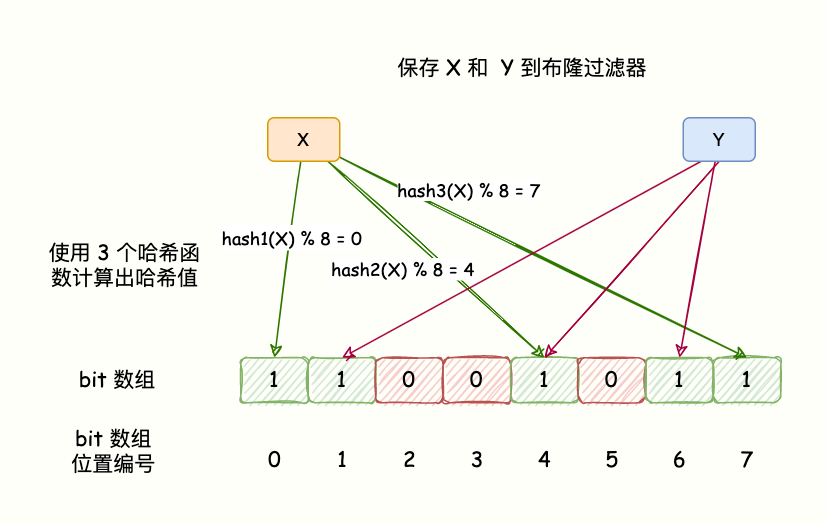 硬核 | Redis 布隆(Bloom Filter)过滤器原理与实战
2022-03-25
硬核 | Redis 布隆(Bloom Filter)过滤器原理与实战
2022-03-25
 Redis主从、哨兵、 Cluster集群一锅端!
2022-03-22
Redis主从、哨兵、 Cluster集群一锅端!
2022-03-22
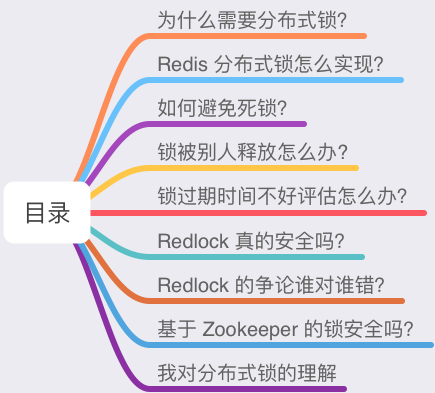 深度剖析:Redis分布式锁到底安全吗?看完这篇文章彻底懂了
2022-03-10
深度剖析:Redis分布式锁到底安全吗?看完这篇文章彻底懂了
2022-03-10
记一次 .NET 某妇产医院 WPF内存溢出分析 2021-12-28
记一次 .NET 某市附属医院 Web程序 偶发性CPU爆高分析 2021-12-28
 asp.net core 集成swagger ui
2021-10-07
asp.net core 集成swagger ui
2021-10-07