在上篇文章 identityserver4入门介绍 中,我们介绍了Identity Server 框架涉及的一些常用术语,以及基本的控制流程,这篇文章我们来介绍下如何借助IdentityServer4来实现单点登录,及API授权访问控制, 这篇文章所涉及的场景主要适用于 如果我们的网站需要接入第三方登录认证功能,并且需要访问第三方系统的相关API时的场景,通过这篇文章我们还可以了解到如何给外部系统提供我们的统一登录认证功能,举个例子,比如我的个人博客接入了博客园的登录功能,那么我的个人博客相对于博客园来说就是客户端应用,博客园就是统一认证平台,同样换个方向来说,如果哪一天我们搞了一个类似于社交网站,有大量的用户信息注册,那么别人的网站可能就会借助我们的站点进行登录认证,那么我们的系统就是统一认证平台,别人的网站就是客户端应用,本篇文章将会带大家怎样去实现一个统一认证平台(通过IdentityServer4框架实现),以及客户端应用如何接入IdentityServer认证服务器。
开始创建各个项目之前,请先使用以下命令安装IdentityServer官方给大家提供的一些模板项目,以便快捷创建IdentityServer认证/授权服务,客户端应用等。
dotnet new -i IdentityServer4.Templates
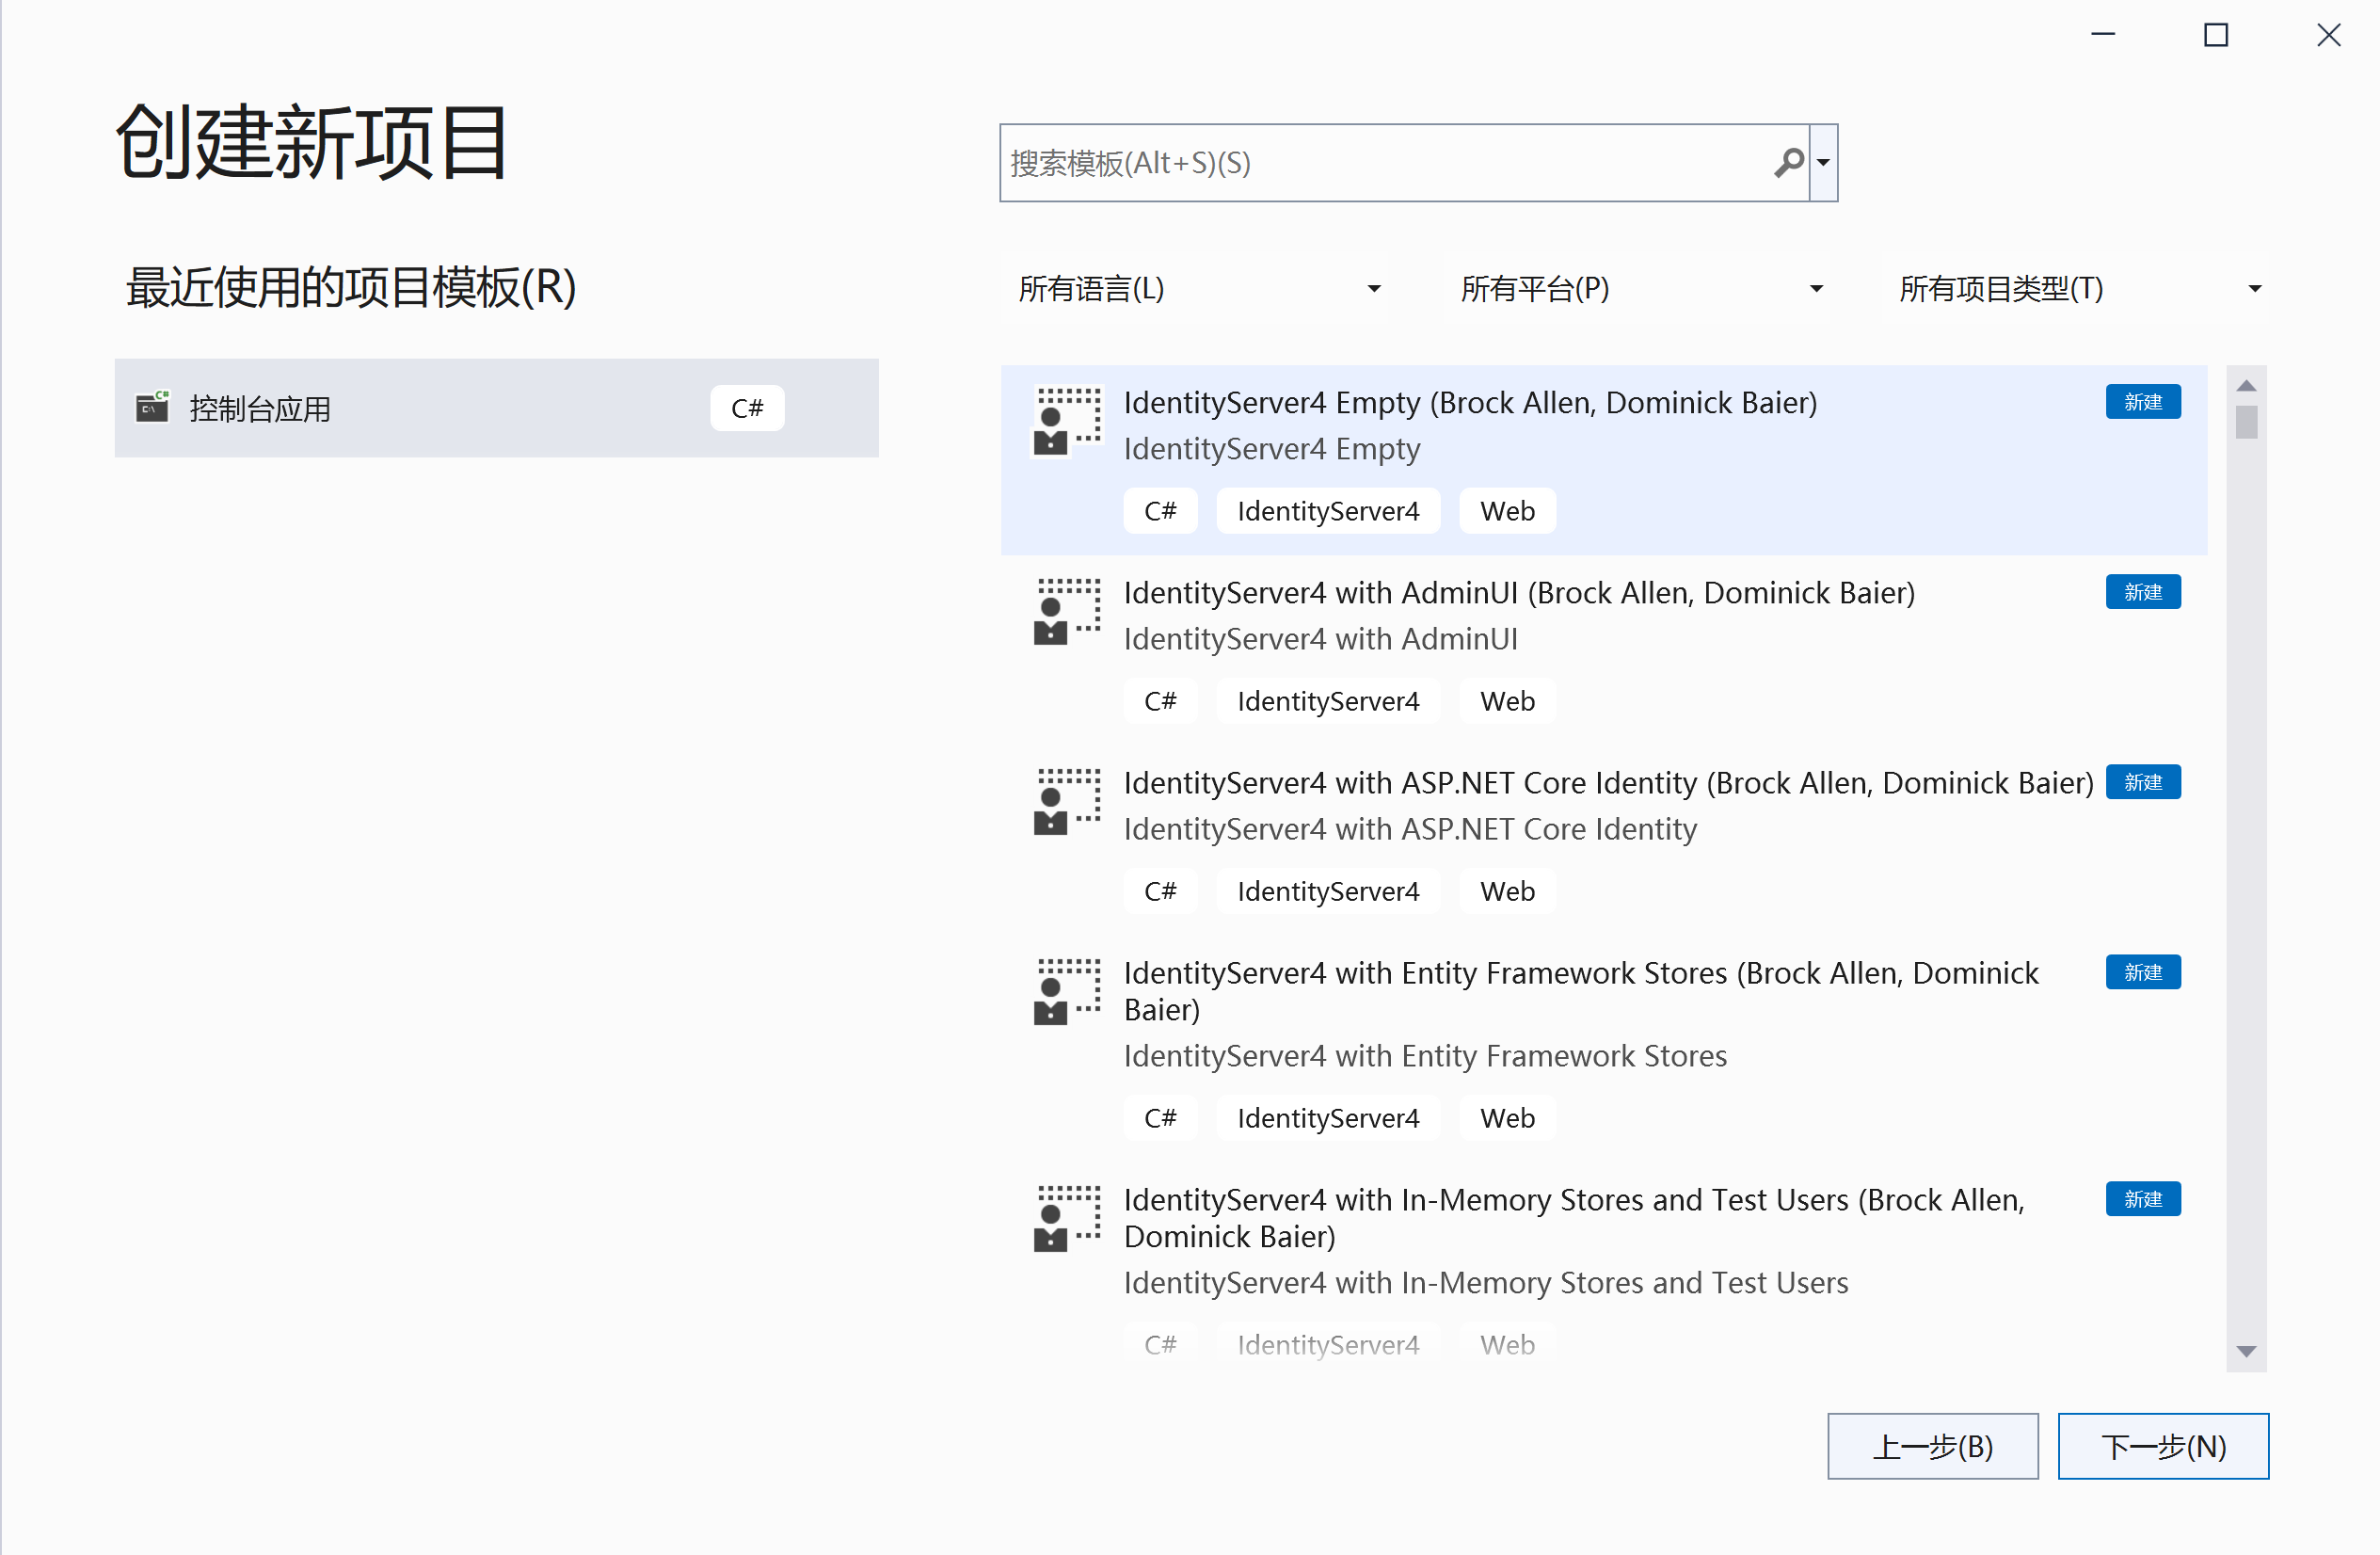
安装成功之后,Visual Studio 2022 新建项目的时候会出现IdentityServer4官方的相关模板。
创建认证/授权服务
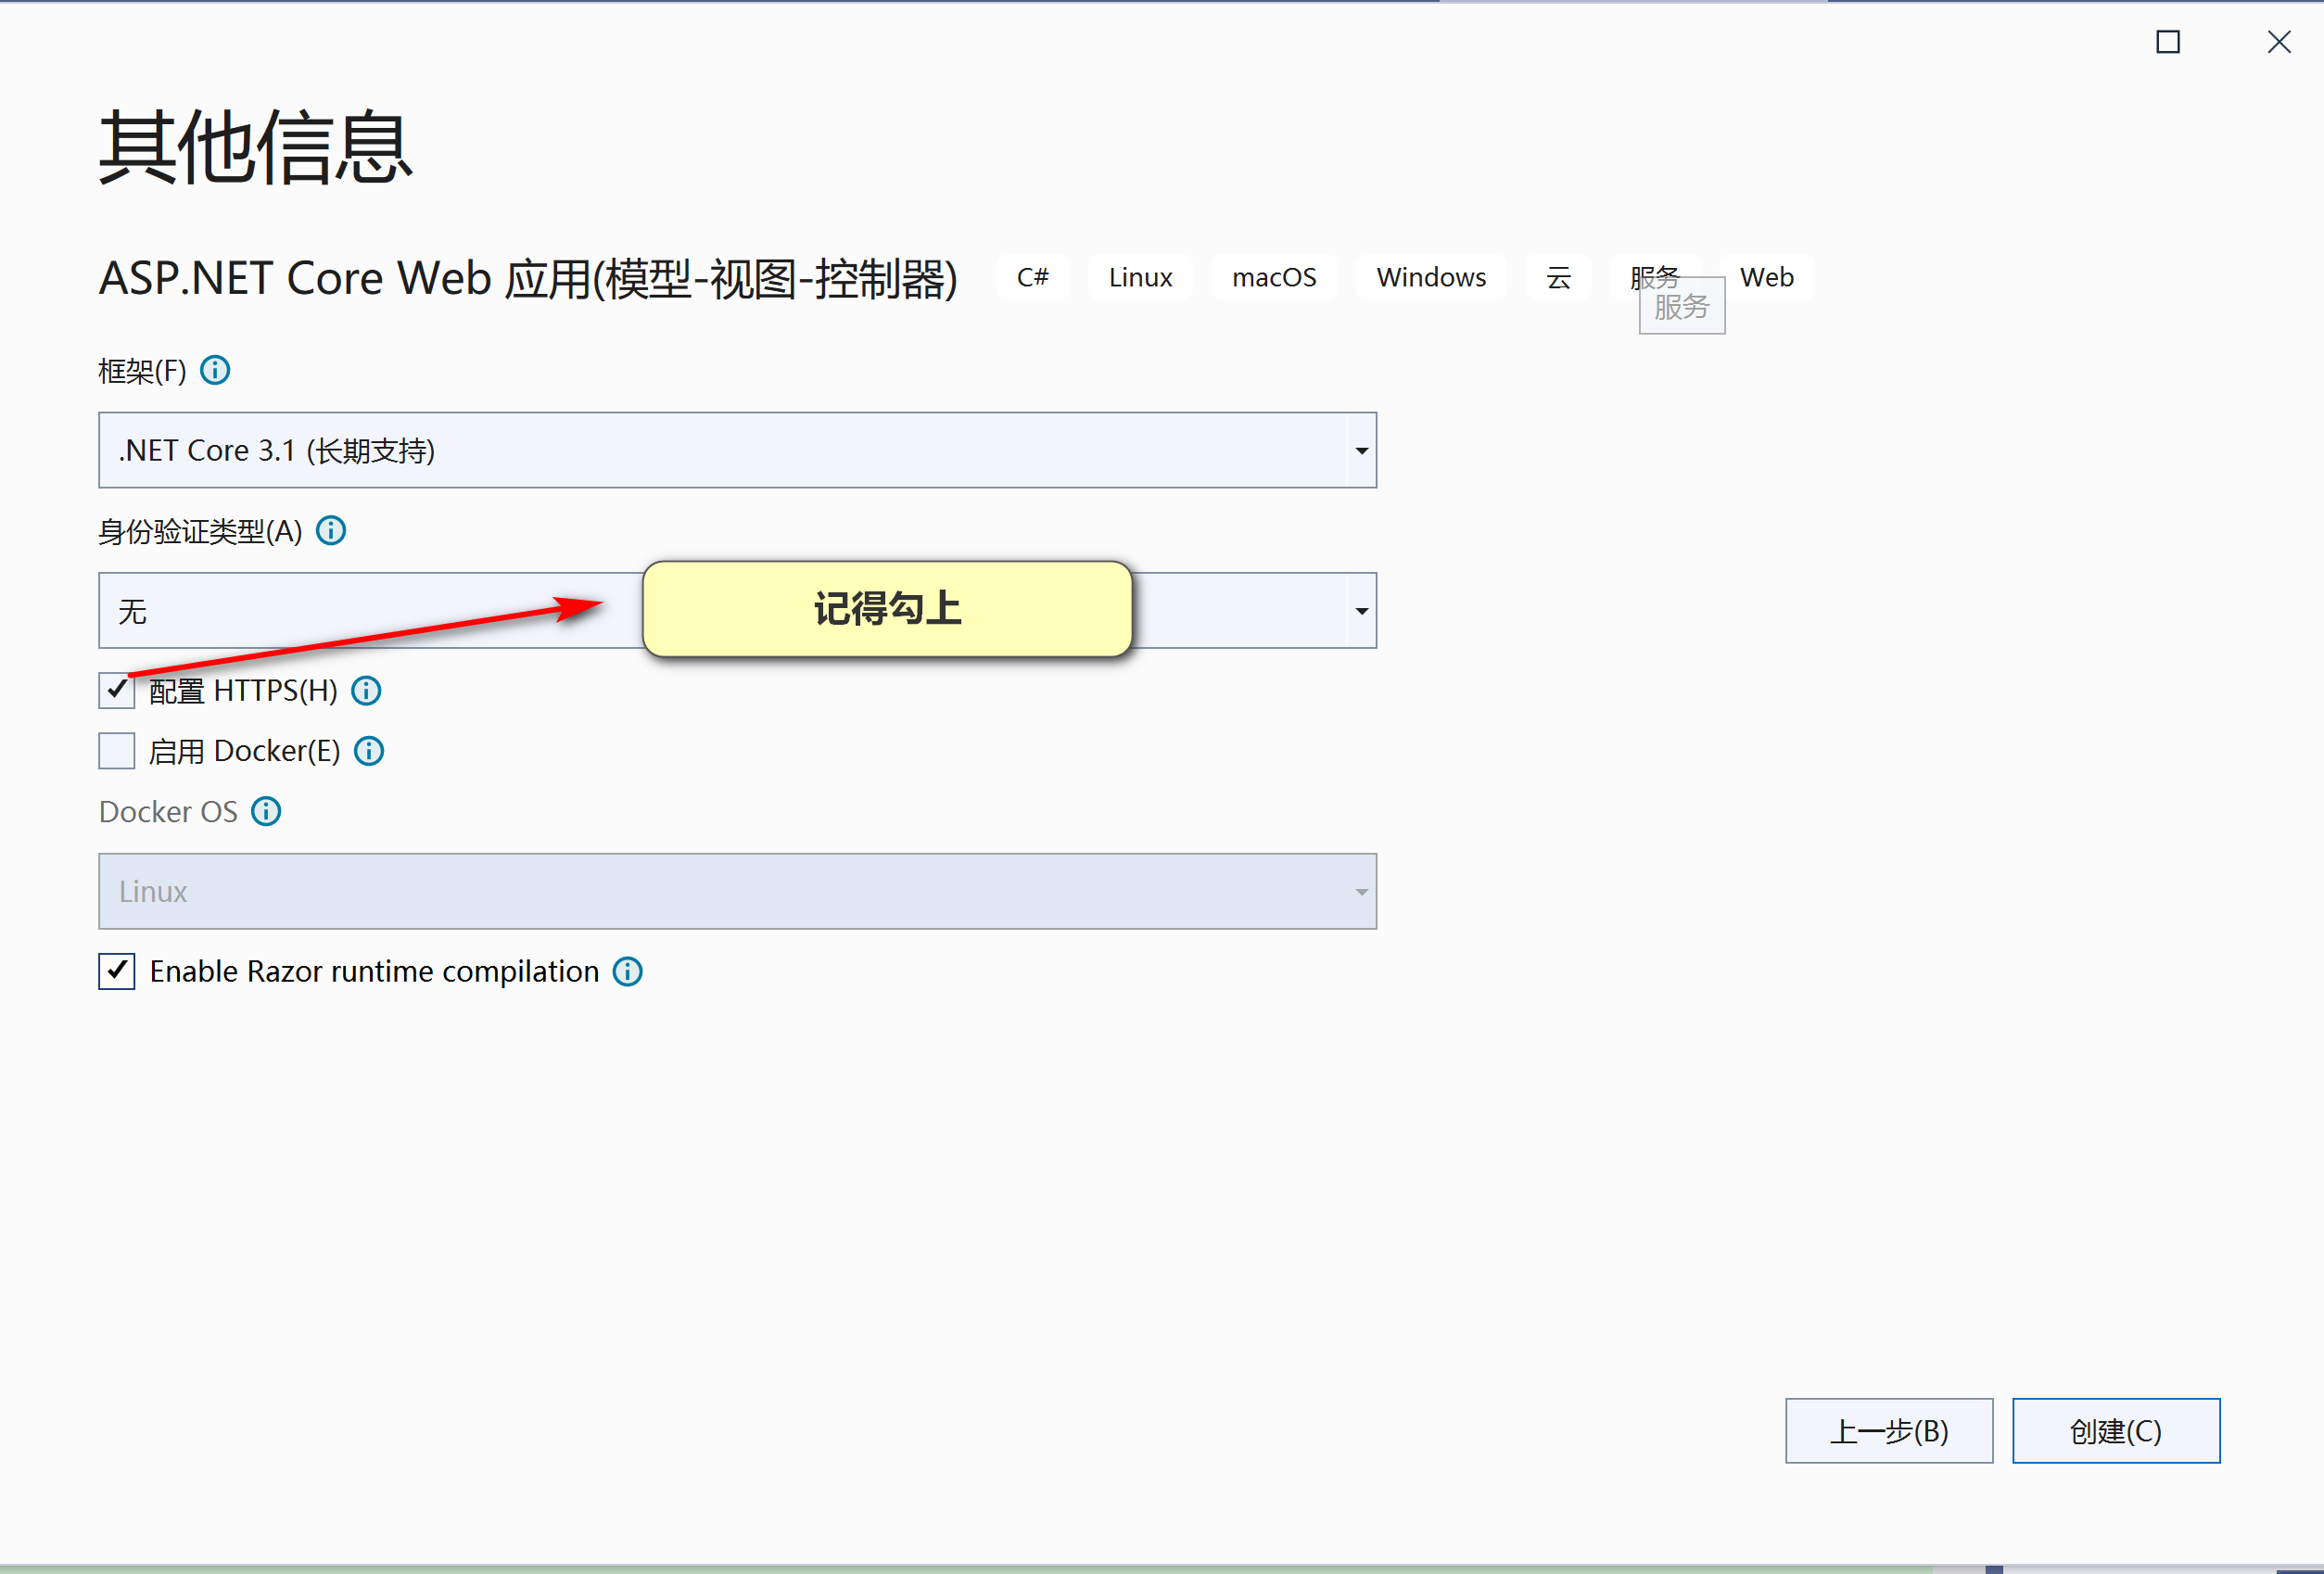
创建项目的时候,记得勾上启用https
这里我们约定好,创建的认证/授权服务的地址为:https://localhost:5001,注意,启动的时候使用SelfHost方式启动,并在launchSettings.json文件中配置好启动后监听的端口,这样可以直接看到IdentityServer框架打印的一些日志,对于学习框架的内部通讯流程有帮助。
选择如下图中的这个IdentityServer4模板项目,创建一个带UI,并且客户端应用配置信息,API信息、用户授权信息存储在内存中的IdentityServer4认证授权服务。
使用这个模板的好处就是不用我们自己去编写认证服务器的登录逻辑,并且对于第三方客户端应用跳转过来登录成功后跳转回第三方客户端应用的逻辑都已经帮忙处理了,
登录相关的UI界面也都已经自动创建好了,对于已经存在的项目,如果需要添加这些登录页面及登录逻辑代码,则可以通过在需要集成IdentityServer的项目的根目录(.csproj文件所在目录)下面运行以下命令来安装相关的界面及代码:
dotnet new is4ui

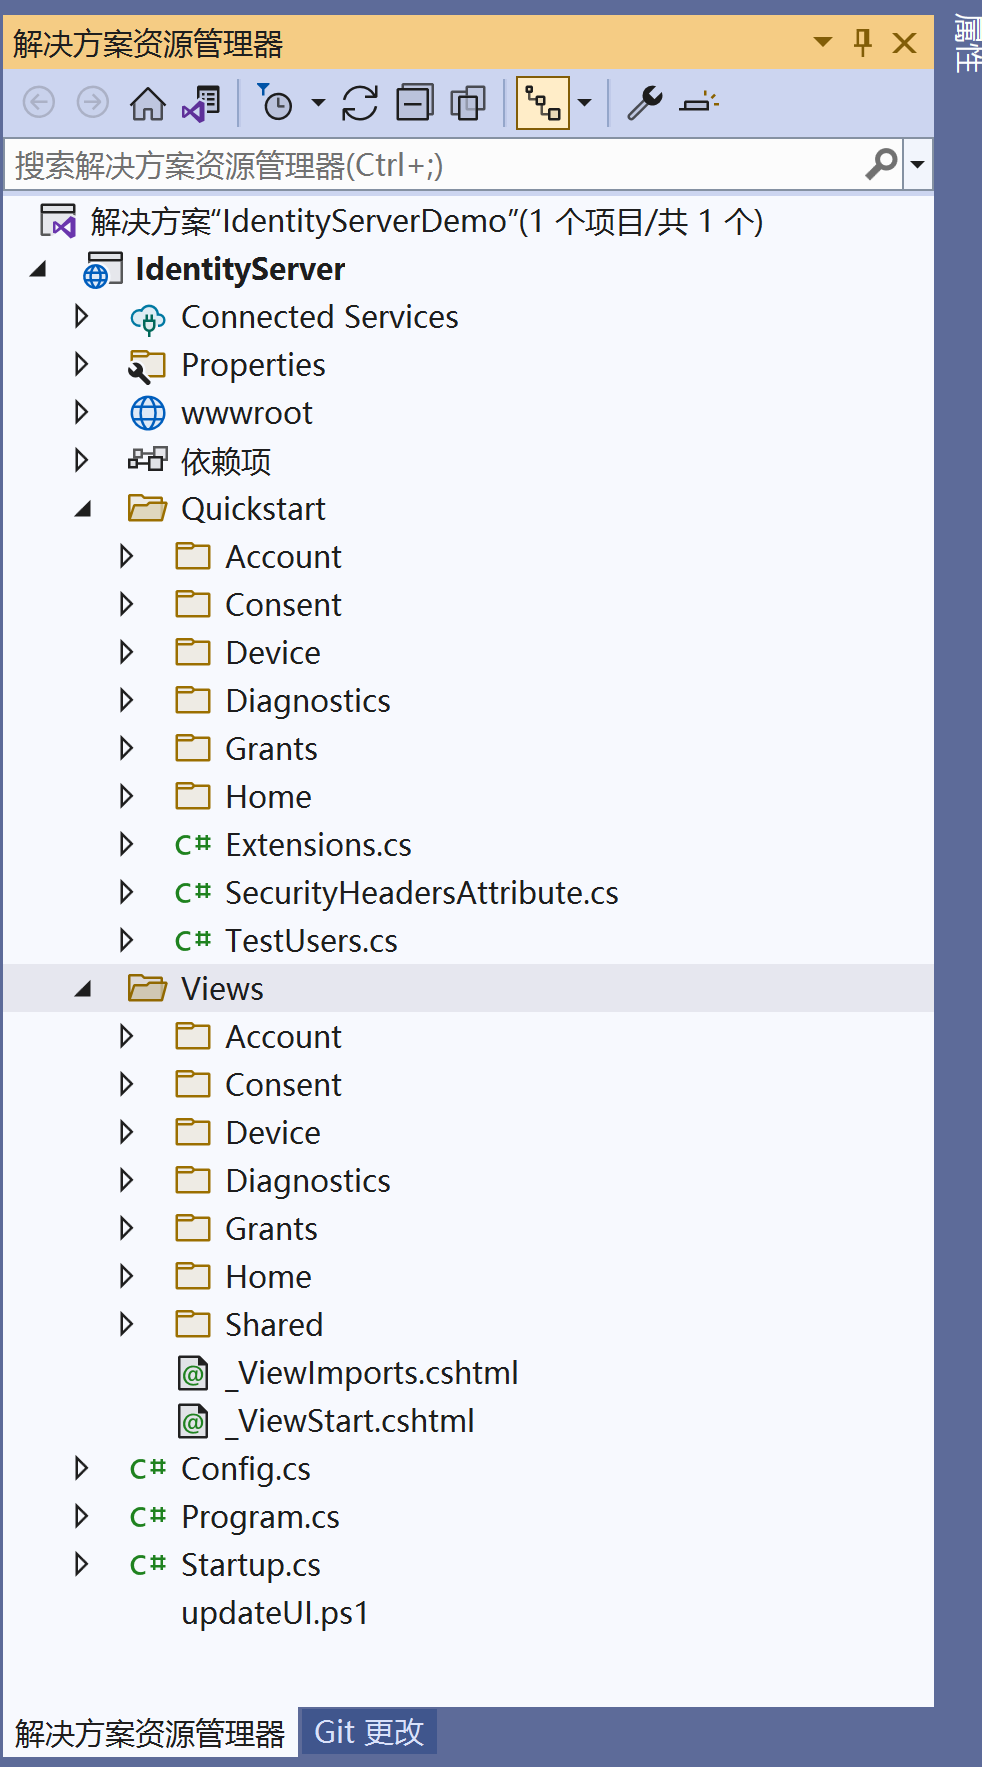
创建好后,看到的项目结构类似于如下:
打开Startup.cs,我们看下ConfigureServices方法和Configure方法。
public void ConfigureServices(IServiceCollection services)
        {
            services.AddControllersWithViews();

            //这里添加IdentityServer认证及授权相关的服务。
            //这里面添加了为授权服务器本站进行认证的认证方案,认证cookie名称为:idsrv。
            var builder = services.AddIdentityServer(options =>
            {
                options.Events.RaiseErrorEvents = true;
                options.Events.RaiseInformationEvents = true;
                options.Events.RaiseFailureEvents = true;
                options.Events.RaiseSuccessEvents = true;

                // see https://identityserver4.readthedocs.io/en/latest/topics/resources.html
                options.EmitStaticAudienceClaim = true;
            })
            //这里告诉IdentityServer认证服务器哪些用户可以登录,登录成功之后,
            //如果用户是从第三方应用跳转过来,
            //那么这些用户的基本信息将会以IdentityToken的形式转发给客户端应用。
             .AddTestUsers(TestUsers.Users);

            // in-memory, code config
            //告诉IdentityServer认证服务器有哪些用户信息可以被客户端应用获取。
            //注意,这里面定义的是整个认证系统支持被客户端获取的用户信息列表,并不是每个客户端应用
            //都能获取这里面的所有用户信息,每个客户端应用能获取什么用户信息,需要根据配置来。
            builder.AddInMemoryIdentityResources(Config.IdentityResources);
            //告诉IdentityServer认证服务器控有哪些API需要被控制访问,也就是说这边
            //定义了所有API,注意,这里面并不是说所有的客户端应用都有这些API访问权限,而是要根据各个客户端应用的配置情况来。
            builder.AddInMemoryApiScopes(Config.ApiScopes);
            //告诉IdentityServer认证服务器有哪些客户端应用可以进行认证及申请授权,
            //如果一个客户端不在这个列表里面,那么无法认证通过,也无法获取访问Token.
            builder.AddInMemoryClients(Config.Clients);

            // not recommended for production - you need to store your key material somewhere secure
            builder.AddDeveloperSigningCredential();

            //这里仅仅表示让认证服务器支持Google账号登录,如果不需要可以注释掉。
            services.AddAuthentication()
                .AddGoogle(options =>
                {
                    options.SignInScheme = IdentityServerConstants.ExternalCookieAuthenticationScheme;

                    // register your IdentityServer with Google at https://console.developers.google.com
                    // enable the Google+ API
                    // set the redirect URI to https://localhost:5001/signin-google
                    options.ClientId = "copy client ID from Google here";
                    options.ClientSecret = "copy client secret from Google here";
                });
        }
Configure方法如下:
        public void Configure(IApplicationBuilder app)
        {
            if (Environment.IsDevelopment())
            {
                app.UseDeveloperExceptionPage();
            }

            app.UseStaticFiles();

            app.UseRouting();
            //这里启用登录认证中间件(AddAuthentication),添加对IdentityServer框架中的几个接口地址的请求处理逻辑(也是以中间件的形式拦截)
            //注意必须放在UseRouting之后,UseEndPoints以及UseAuthorization之前。
            app.UseIdentityServer();
            app.UseAuthorization();
            app.UseEndpoints(endpoints =>
            {
                endpoints.MapDefaultControllerRoute();
            });
        }
接下来看看Config.cs中的代码。
// Copyright (c) Brock Allen & Dominick Baier. All rights reserved.
// Licensed under the Apache License, Version 2.0. See LICENSE in the project root for license information.


using IdentityServer4.Models;
using System.Collections.Generic;

namespace IdentityServer
{
    public static class Config
    {
        /// <summary>
        /// 这里定义了IdentityServer认证服务器所能允许客户端应用获取的所有的用户信息列表,
        /// 这里面没有定义的用户信息,客户端应用是无法通过访问Token(AccessToken)或者身份Token(IdentityToken)获取的
        /// 这里说的用户信息指的就是用户声明(UserClaim),用户声明简单说就是键值对,
        /// 如:邮箱:2782815239@qq.com,性别:男等之类的信息
        /// 一个IdentityResource对象里面可以包含一个或者多个用户声明(UserClaim)
        /// </summary>
        public static IEnumerable<IdentityResource> IdentityResources =>
            new IdentityResource[]
            {
                new IdentityResources.OpenId(),
                //通过查看源码,可以看到Profile这个IdentityResource里面定义了以下这些用户信息,
                //也就是如果给一个客户端应用分配了profile(IdentityResource的Name属性对应的值)这个权限,那么用户登录这个客户端应用之后,客户端应用
                //将能获取下面对应的所有用户的信息。
                //"name",
			    //"family_name",
               //         "given_name",
               //         "middle_name",
               //         "nickname",
               //         "preferred_username",
               //         "profile",
               //         "picture",
               //         "website",
               //         "gender",
               //         "birthdate",
               //         "zoneinfo",
               //         "locale",
               //         "updated_at"
                new IdentityResources.Profile(),
                new IdentityResource(){Name="offlineaccess"}
            };

        /// <summary>
        /// 这里面定义了IdentityServer认证服务器所能控制的所有API列表。
        /// 如果API名称不在这个列表里面,客户端应用是无法请求获取,也就没法被包含在访问Token中。
        /// </summary>
        public static IEnumerable<ApiScope> ApiScopes =>
            new ApiScope[]
            {
                new ApiScope("scope1"),
                new ApiScope("scope2"),
            };

        /// <summary>
        /// 这里面定义了IdentityServer认证服务器所能识别的所有的客户端应用信息。
        /// 不在这个列表里面的客户端应用是无法通过认证服务器获取AccessToken以及IdentityToken的。
        /// </summary>
        public static IEnumerable<Client> Clients =>
            new Client[]
            {
                // interactive client using code flow + pkce
                new Client
                {
                    //定义客户端应用的唯一标识编号。
                    ClientId = "interactive",
                    //客户端应用的认证秘钥。
                    ClientSecrets = { new Secret("49C1A7E1-0C79-4A89-A3D6-A37998FB86B0".Sha256()) },
                    //表示interactive这个客户端应用使用授权码模式来进行认证。
                    AllowedGrantTypes = GrantTypes.Code,
                    //告诉IdentityServer,用户在认证授权服务器登录成功后,需要跳转到客户端应用的哪个页面地址。
                    //如果客户端应用没有使用第三方库(比如:Microsoft.AspNetCore.Authentication.OpenIdConnect)来实现认证登录功能的话,通过注释客户端应用中的UseAuthentication方法,
                    //那么必须在客户端应用中定义signin-oidc这个路径对应的页面或者controller地址,这个URL路径一般
                    //是用于客户端应用需要自定义实现本地登录认证逻辑时使用
                    RedirectUris = { "https://localhost:5002/signin-oidc" },
                    //表示
                    FrontChannelLogoutUri = "https://localhost:5002/signout-oidc",
                    PostLogoutRedirectUris = { "https://localhost:5002/signout-callback-oidc" },
                    //表示是否允许客户端应用请求获取刷新Token.
                    AllowOfflineAccess = true,
                    //表示客户端允许访问哪些API,以及允许访问哪些IdentityResource.
                    //这里面的sope2为ApiScope类的Name属性值,表示拥有scope2这个API访问权限。
                    //openid profile 为IdentityResource类的Name属性值,表示拥有openid和profile这两个IdentityResource所包含的那些用户信息(用户声明-UserClaim)的获取权限。
                    //AllowedScopes列表里面的IdentityResource名称最终都会被包含到AccessToken的scope属性中去
                    //但是Api 名称则需要根据客户端是否有请求相应Api的访问权限来决定是否要包含到AccessToken的scope属性中去。
                    AllowedScopes = { "openid", "profile", "scope2","offlineaccess"},
                    //表示允许将用户的基础信息包含在IdentityToken中去,同时这些用户声明会自动被填充到客户端应用的本地登录信息的用户声明中,
                    //而本地登录信息则最终被存储到客户端的认证cookie中去。
                    AlwaysIncludeUserClaimsInIdToken = true
                },
                // m2m client credentials flow client
                new Client
                {
                    ClientId = "m2m.client",
                    ClientName = "Client Credentials Client",
                    AllowedGrantTypes = GrantTypes.ClientCredentials,
                    ClientSecrets = { new Secret("511536EF-F270-4058-80CA-1C89C192F69A".Sha256()) },
                    AllowedScopes = { "scope1" }
                },
            };
    }
}
登录页面登录代码(AccountController)
        /// <summary>
        /// Handle postback from username/password login
        /// </summary>
        [HttpPost]
        [ValidateAntiForgeryToken]
        public async Task<IActionResult> Login(LoginInputModel model, string button)
        {
            // check if we are in the context of an authorization request
            //根据登录成功后要跳转的地址来判断是否是第三方客户端应用,
            //如是从第三方客户端应用跳转过来的,则不为空。
            var context = await _interaction.GetAuthorizationContextAsync(model.ReturnUrl);

            // the user clicked the "cancel" button
            if (button != "login")
            {
                if (context != null)
                {
                    // if the user cancels, send a result back into IdentityServer as if they
                    // denied the consent (even if this client does not require consent).
                    // this will send back an access denied OIDC error response to the client.
                    await _interaction.DenyAuthorizationAsync(context, AuthorizationError.AccessDenied);

                    // we can trust model.ReturnUrl since GetAuthorizationContextAsync returned non-null
                    if (context.IsNativeClient())
                    {
                        // The client is native, so this change in how to
                        // return the response is for better UX for the end user.
                        return this.LoadingPage("Redirect", model.ReturnUrl);
                    }

                    return Redirect(model.ReturnUrl);
                }
                else
                {
                    // since we don't have a valid context, then we just go back to the home page
                    return Redirect("~/");
                }
            }

            if (ModelState.IsValid)
            {
                // validate username/password against in-memory store
                if (_users.ValidateCredentials(model.Username, model.Password))
                {
                    var user = _users.FindByUsername(model.Username);
                    await _events.RaiseAsync(new UserLoginSuccessEvent(user.Username, user.SubjectId, user.Username, clientId: context?.Client.ClientId));

                    // only set explicit expiration here if user chooses "remember me".
                    // otherwise we rely upon expiration configured in cookie middleware.
                    AuthenticationProperties props = null;
                    if (AccountOptions.AllowRememberLogin && model.RememberLogin)
                    {
                        props = new AuthenticationProperties
                        {
                            IsPersistent = true,
                            ExpiresUtc = DateTimeOffset.UtcNow.Add(AccountOptions.RememberMeLoginDuration)
                        };
                    };

                    // issue authentication cookie with subject ID and username
                    var isuser = new IdentityServerUser(user.SubjectId)
                    {
                        DisplayName = user.Username
                    };

                    await HttpContext.SignInAsync(isuser, props);

                    //不为空表示第三方客户端应用登录,跳转回第三方应用页面。
                    if (context != null)
                    {
                        if (context.IsNativeClient())
                        {
                            // The client is native, so this change in how to
                            // return the response is for better UX for the end user.
                            return this.LoadingPage("Redirect", model.ReturnUrl);
                        }

                        // we can trust model.ReturnUrl since GetAuthorizationContextAsync returned non-null

                        return Redirect(model.ReturnUrl);
                    }

                    // request for a local page
                    if (Url.IsLocalUrl(model.ReturnUrl))
                    {
                        return Redirect(model.ReturnUrl);
                    }
                    else if (string.IsNullOrEmpty(model.ReturnUrl))
                    {
                        return Redirect("~/");
                    }
                    else
                    {
                        // user might have clicked on a malicious link - should be logged
                        throw new Exception("invalid return URL");
                    }
                }

                await _events.RaiseAsync(new UserLoginFailureEvent(model.Username, "invalid credentials", clientId: context?.Client.ClientId));
                ModelState.AddModelError(string.Empty, AccountOptions.InvalidCredentialsErrorMessage);
            }

            // something went wrong, show form with error
            var vm = await BuildLoginViewModelAsync(model);
            return View(vm);
        }
创建客户端应用
创建项目的时候,记得勾上启用https
这里我们先约定好,创建的客户端应用的访问地址为:https://localhost:5002,注意,启动的时候使用SelfHost方式启动,并在launchSettings.json文件中配置好启动后监听的端口。
新建项目名为MvcClient的客户端应用,然后添加对名为:Microsoft.AspNetCore.Authentication.OpenIdConnect 这个Nuget包的引用,这个包主要用于实现客户端应用的本地登录功能,用户通过IdentityServer登录成功后,IdentityServer会将页面跳转回客户端应用的指定地址,然后客户端应用通过集成的这个包实现OpenIdConnect本地登录功能,另外这个包还有一个功能就是当客户端应用检测到当前用户未登录时,将用户的页面跳转到IdentityServer认证服务器的作用,
添加上述Nuget包后,打开Startup.cs文件。
        // This method gets called by the runtime. Use this method to add services to the container.
        public void ConfigureServices(IServiceCollection services)
        {
            services.AddControllersWithViews();
            JwtSecurityTokenHandler.DefaultMapInboundClaims = false;
            services.AddAuthentication(options =>
            {
                //这里表示该客户端应用使用Cookie认证来检测用户是否已经登录,
                //如果本地客户端应用已经登录成功,则浏览器将会往该客户端应用发送名为.AspNetCore.Cookies的Cookie.
                //这个值就是下面AddCookie方法中的参数值。
                options.DefaultScheme = "Cookies";
                //这里表示当用户未登录时,客户端应用使用哪个认证方案去处理后续流程,也就是AddOpenIdConnect方法的参数值。
                //这里后续流程就是,当检测到用户未登录时,内部会调用oidc这个认证方案的Chanllenge方法,然后跳转到IdentityServer登录页进行登录。
                options.DefaultChallengeScheme = "oidc";
            })
            .AddCookie("Cookies")
            .AddOpenIdConnect("oidc", options =>
            {
                options.Authority = "https://localhost:5001";//这个是IdentityServer认证服务器的部署地址。
                options.ClientId = "interactive";//这个是该客户端应用在IdentityServer服务器上的唯一标识,也就是对应Client类的ClientId属性
                options.ClientSecret = "49C1A7E1-0C79-4A89-A3D6-A37998FB86B0";//这个是客户端应用的秘钥,也就是对应Client类的ClientSecrets属性所包含的值。
                //表示用户在IdentityServer登录成功后,认证服务器要返回给客户端应用的是授权码。
                //客户端应用根据获取到的授权码去再去IdentityServer认证服务器请求IdentityToken和AccessToken.
                //如果指定为 id_token code 那么identity token登录成功后直接返回给客户端应用,而不是通过接口去请求获取。
                options.ResponseType = "code";
                options.SaveTokens = true;//表示将Token保存到浏览器cookie中。
            });
        }
下面是定义用于接收IdentityServer认证服务器回传回来的授权码或者Token信息的Action.
        /// <summary>
        /// 表示客户端应用中用于接收IdentityServer认证服务器回传回来的token或者授权码的页面地址。
        /// 默认IdentityServer用表单提交方式将Token或者授权码提交给客户端应用
        /// 也可指定为用URL查询字符串方式传递,那么用HttpContext.Request.Query来获取这些值
        /// </summary>
        /// <param name="formCollection">这里包含了IdentityServer认证服务器提交过来的授权码等信息</param>
        /// <returns></returns>
        [Route("/signin-oidc")]
        public IActionResult Login(IFormCollection formCollection)
        {
            //这里实现自定义登录逻辑
            return Content("登录成功");
        }
做好以上两个步骤后,我们先启动IdentityServer认证服务器,启动后的地址应该为:https://localhost:5001,然后再启动客户端应用MvcClient,这个时候由于还未登录会自动跳转到
认证服务器的登录页面。

输入用户名和密码,登录成功后会自动跳转回客户端应用的页面.
我们可以往客户端应用添加如下页面,来查看当前登录用户从IdentityServer认证服务器那边获取到的信息。
@using Microsoft.AspNetCore.Authentication
@{
    ViewData["Title"] = "Security";
}
<h2>Claims</h2>

<dl>
    @foreach (var claim in User.Claims)
    {
        <dt>@claim.Type</dt>
        <dd>@claim.Value</dd>
    }
</dl>

<h2>Properties</h2>

<dl>
    @foreach (var prop in (await Context.AuthenticateAsync()).Properties.Items)
    {
        <dt>@prop.Key</dt>
        <dd>@prop.Value</dd>
    }
</dl>
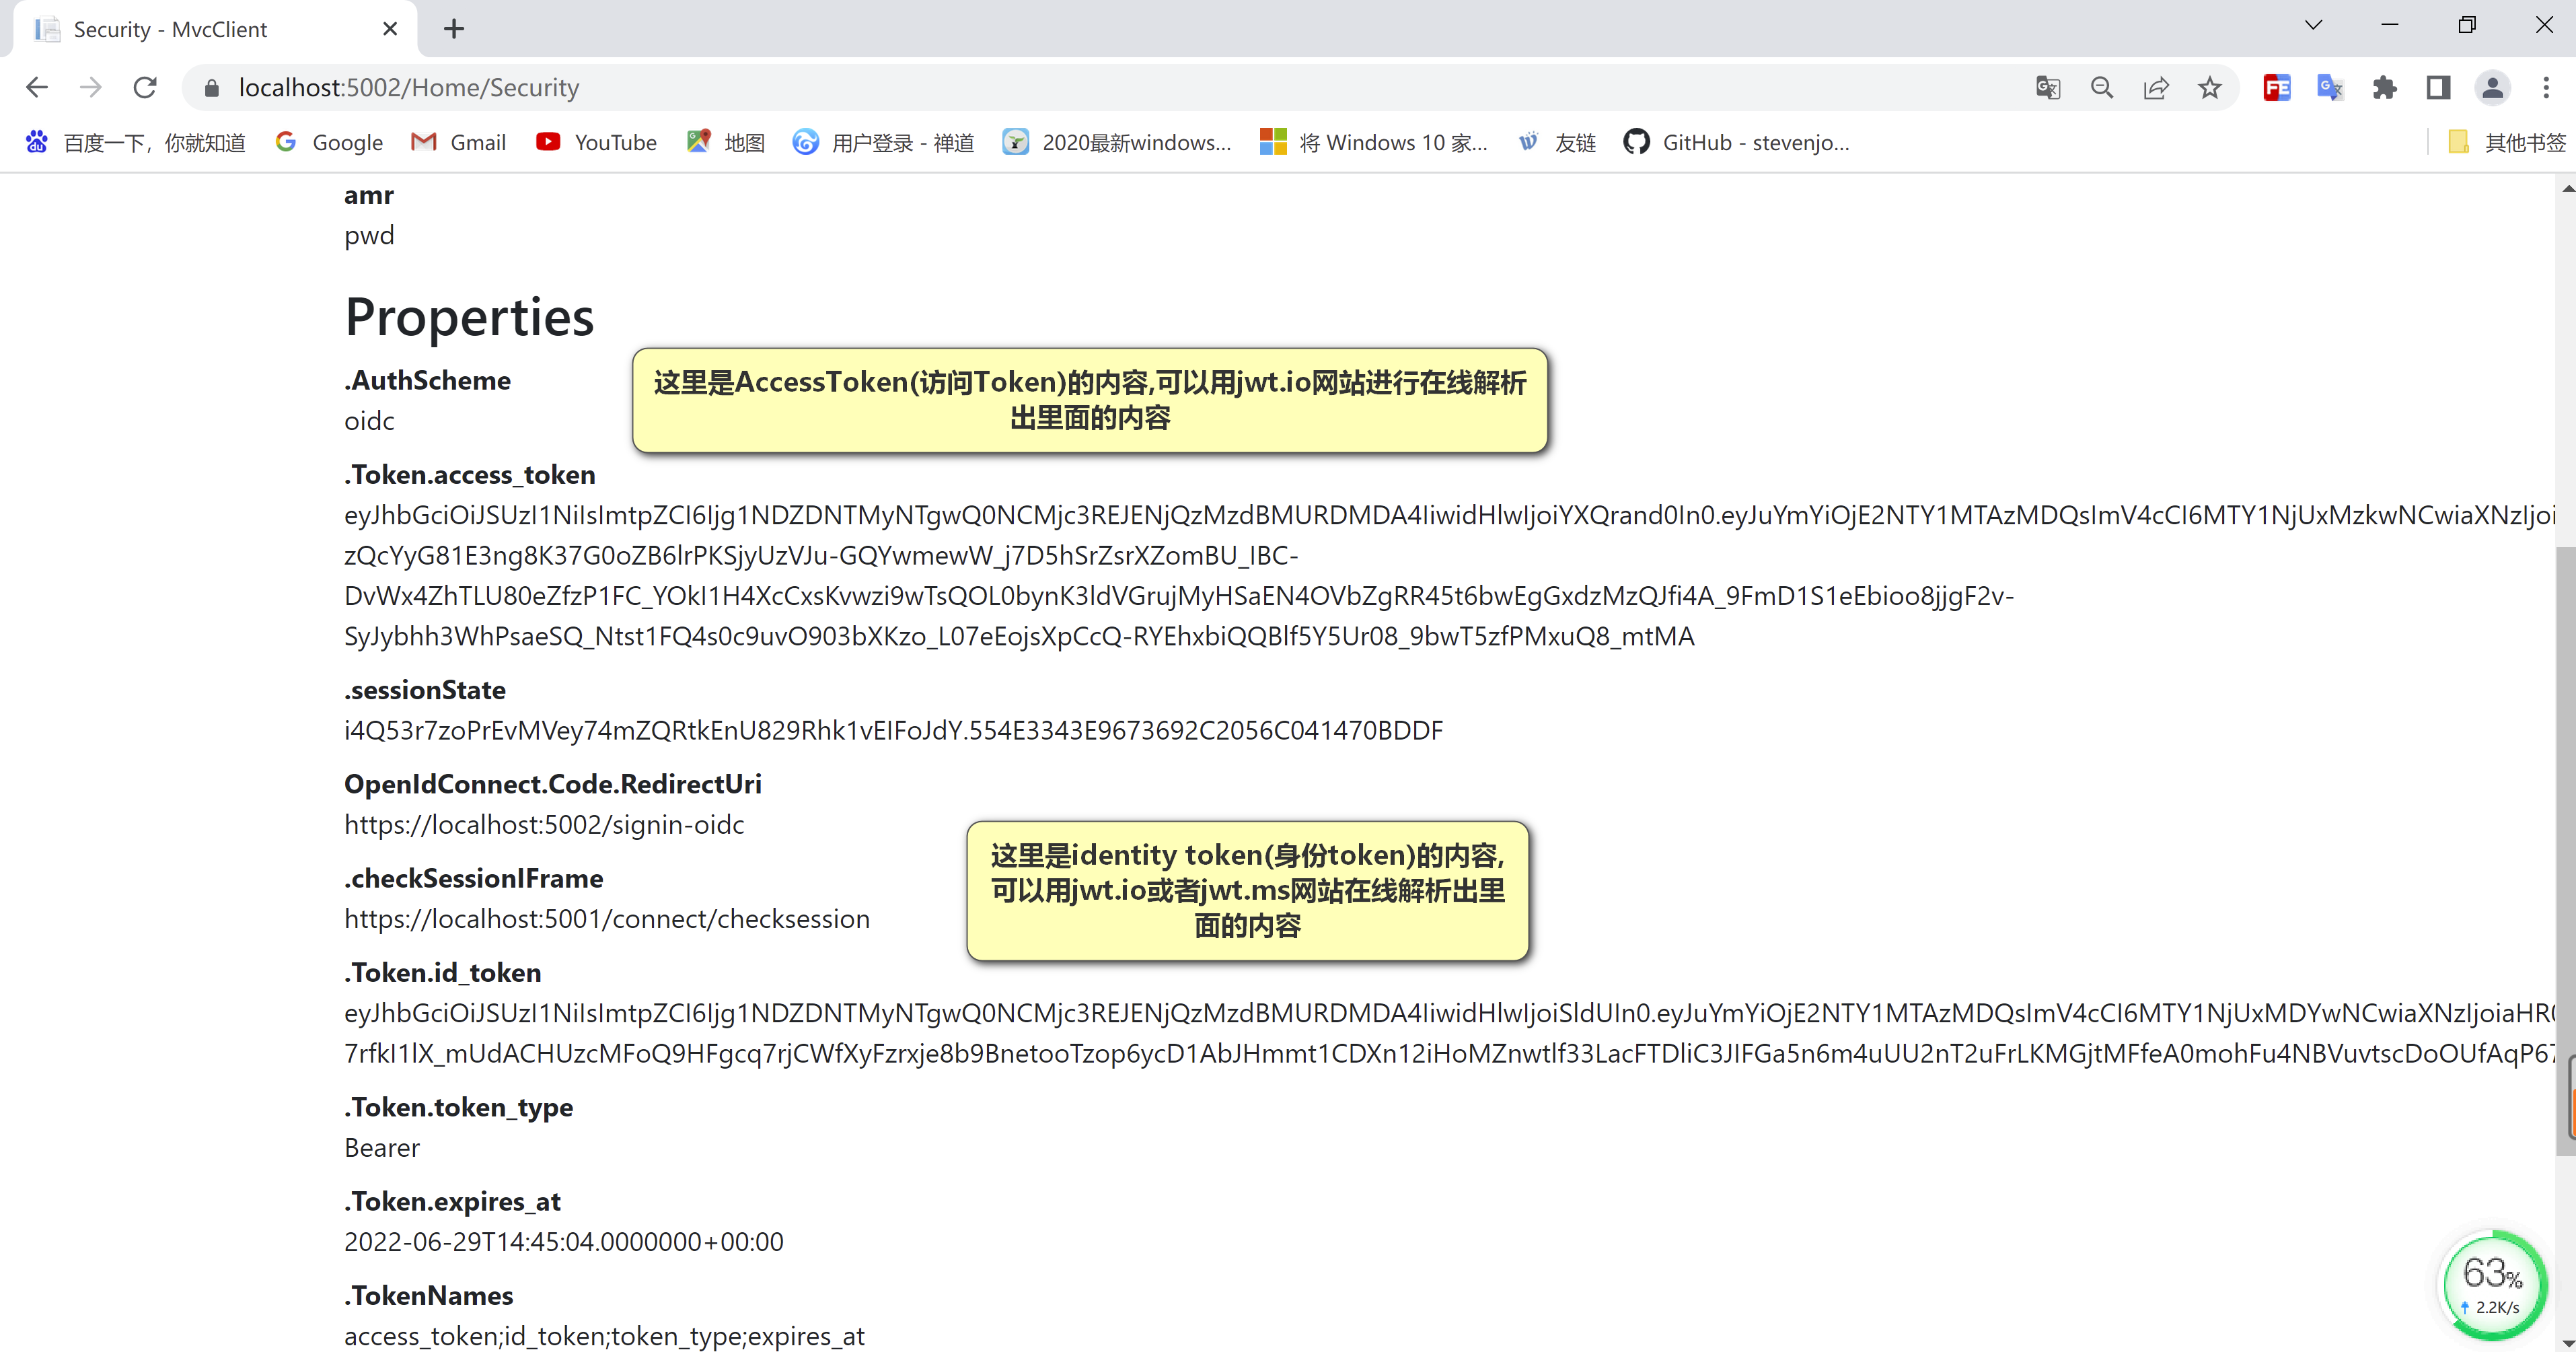
AccessToken解析出来效果大概如下:
{
  "alg": "RS256",
  "kid": "8546C532580CCB277DBD64337A1DC008",
  "typ": "at+jwt"
}.{
  "nbf": 1656595156,
  "exp": 1656598756,
  "iss": "https://localhost:5001",
  "aud": "https://localhost:5001/resources",
  "client_id": "interactive",
  "sub": "818727",
  "auth_time": 1656423317,
  "idp": "local",
  "jti": "36C2AC24E1BC881EE3AC3BC2AFA34897",
  "sid": "4EC49AA07134A4E2FE56E57208627B31",
  "iat": 1656595156,
  "scope": [
    "openid",
    "profile"
  ],
  "amr": [
    "pwd"
  ]
}.[Signature]
IdentityToken解析出来效果大概如下:
{
  "alg": "RS256",
  "kid": "8546C532580CCB277DBD64337A1DC008",
  "typ": "JWT"
}.{
  "nbf": 1656595156,
  "exp": 1656595456,
  "iss": "https://localhost:5001",
  "aud": "interactive",
  "nonce": "637921919560589475.YzZkNTFlNGUtMGVjNS00MTM0LWE1MTAtNTNhYzgxMDFlMzUzYTIwZGQxN2EtYjFiNS00M2RlLTg5ZjgtZjM4NWViNmQyMzA2",
  "iat": 1656595156,
  "at_hash": "buwOZSZ1ACiTTzNGQNZQkA",
  "s_hash": "42w6X_99TWRW-OY3K3SRBg",
  "sid": "4EC49AA07134A4E2FE56E57208627B31",
  "sub": "818727",
  "auth_time": 1656423317,
  "idp": "local",
  "amr": [
    "pwd"
  ]
}.[Signature]
上面,我们可以看到IdentityServer认证服务器那边是允许访问名为scope2的api的,但是为什么AccessToken中的scope属性中没有包含而仅仅只是包含了IdentityResource的访问权限呢,这是因为我们客户端应用没有去指定要去请求这个api,可以按照如下方式来指定获取scope2这个api的访问权限。
// This method gets called by the runtime. Use this method to add services to the container.
        public void ConfigureServices(IServiceCollection services)
        {
            services.AddControllersWithViews();
            JwtSecurityTokenHandler.DefaultMapInboundClaims = false;
            services.AddAuthentication(options =>
            {
                //这里表示该客户端应用使用Cookie认证来检测用户是否已经登录,
                //如果本地客户端应用已经登录成功,则浏览器将会往该客户端应用发送名为.AspNetCore.Cookies的Cookie.
                //这个值就是下面AddCookie方法中的参数值。
                options.DefaultScheme = "Cookies";
                //这里表示当用户未登录时,客户端应用使用哪个认证方案去处理后续流程,也就是AddOpenIdConnect方法的参数值。
                //这里后续流程就是,当检测到用户未登录时,内部会调用oidc这个认证方案的Chanllenge方法,然后跳转到IdentityServer登录页进行登录。
                options.DefaultChallengeScheme = "oidc";
            })
            .AddCookie("Cookies")
            .AddOpenIdConnect("oidc", options =>
            {
                options.Authority = "https://localhost:5001";//这个是IdentityServer认证服务器的部署地址。
                options.ClientId = "interactive";//这个是该客户端应用在IdentityServer服务器上的唯一标识,也就是对应Client类的ClientId属性
                options.ClientSecret = "49C1A7E1-0C79-4A89-A3D6-A37998FB86B0";//这个是客户端应用的秘钥,也就是对应Client类的ClientSecrets属性所包含的值。
                //表示用户在IdentityServer登录成功后,认证服务器要返回给客户端应用的是授权码。
                //客户端应用根据获取到的授权码去再去IdentityServer认证服务器请求IdentityToken和AccessToken.
                //如果指定为 id_token code 那么identity token登录成功后直接返回给客户端应用,而不是通过接口去请求获取。
                options.ResponseType = "code";

                //这里去请求scope2这个api的访问权限,
                //这里只能添加客户端被允许访问的api,
                //如果请求无访问权限的api则会失败.
                options.Scope.Add("scope2");
                //options.Scope.Add("scope1");


                //这里去请求获取用户信息的权限,profile中包含了多个用户基础信息项目。
                options.Scope.Add("profile");
                //设置为true表示通过IdentityServer认证服务器的UserInfoEndPoint接口获取用户的信息,
                //客户端应用收到IdentityToken后,通过IdentityToken去请求UserInfoEndPoint接口来获取用于的基本信息
                //然后将这些用户声明将被填充到本地登录信息的用户声明中去。
                //如果GetClaimsFromUserInfoEndpoint设置为false,并且IdentityServer认证服务器对该客户端配置的:AlwaysIncludeUserClaimsInIdToken = false
                //那么本地登录后的cookie中将不会包含认证服务器授权给该客户端应用的任何用户的身份信息。
                options.GetClaimsFromUserInfoEndpoint = true;

                //表示是否将Identity Token、AccessToken、Refresh Token 存储到Cookie中(保存到认证Cookie的AuthenticateProperties类型的属性里面)。
                options.SaveTokens = true;
            });
        }
需要注意的是:增加了Api访问权限后,必须退出登录客户端应用,然后重新通过IdentityServer认证服务器统一登录后,才能获取到最新授权的AccessToken,可以通过删除客户端应用中名为 .AspNetCore.Cookies 的Cookie来退出客户端应用登录。
另外,虽然我们的客户端应用被配置为允许获取 profile 这个IdentityResource相关联的用户信息,但在客户端的登录信息Cookie中却没有包含这些用户的信息,那么如果要将允许访问的用户信息包含在客户端的本地登录信息里面以及IdentityToken中我们可以按照如下方式实现(设置 AlwaysIncludeUserClaimsInIdToken = true)。
new Client
                {
                    //定义客户端应用的唯一标识编号。
                    ClientId = "interactive",
                    //客户端应用的认证秘钥。
                    ClientSecrets = { new Secret("49C1A7E1-0C79-4A89-A3D6-A37998FB86B0".Sha256()) },
                    //表示interactive这个客户端应用使用授权码模式来进行认证。
                    AllowedGrantTypes = GrantTypes.Code,
                    //告诉IdentityServer,用户在认证授权服务器登录成功后,需要跳转到客户端应用的哪个页面地址。
                    RedirectUris = { "https://localhost:5002/signin-oidc" },
                    //表示
                    FrontChannelLogoutUri = "https://localhost:5002/signout-oidc",
                    PostLogoutRedirectUris = { "https://localhost:5002/signout-callback-oidc" },
                    //表示是否允许客户端应用请求获取刷新Token.
                    AllowOfflineAccess = true,
                    //表示客户端允许访问哪些API,以及允许访问哪些IdentityResource.
                    //这里面的sope2为ApiScope类的Name属性值,表示拥有scope2这个API访问权限。
                    //openid profile 为IdentityResource类的Name属性值,表示拥有openid和profile这两个IdentityResource所包含的那些用户信息(用户声明-UserClaim)的获取权限。
                    //AllowedScopes列表里面的IdentityResource名称最终都会被包含到AccessToken的scope属性中去
                    //但是Api 名称则需要根据客户端是否有请求相应Api的访问权限来决定是否要包含到AccessToken的scope属性中去。
                    AllowedScopes = { "openid", "profile", "scope2" },
                    //表示允许将用户的基础信息包含在IdentityToken中去,同时这些用户声明会自动被填充到客户端应用的本地登录信息的用户声明中,
                    //而本地登录信息则最终被存储到客户端的认证cookie中去。
                    AlwaysIncludeUserClaimsInIdToken = true
                }
其实,从IdentityServer认证服务器的控制台日志中我们也可以看出如何将用户信息包含在IdentityToken中去。


除了上述这种方式,我们也可以通过在客户端应用这边像前面请求api访问权限一样,去请求获取用户信息,并且包含到客户端的本地登录信息Cookie中去,注意:这种方式只会将请求的用户信息存储到本地登录信息Cookie,不会存储到IdentityToken中去。
设置方式就是将 GetClaimsFromUserInfoEndpoint 设置为true,并且往Scope集合里面添加要请求获取的用户信息。
            .AddOpenIdConnect("oidc", options =>
            {
                options.Authority = "https://localhost:5001";//这个是IdentityServer认证服务器的部署地址。
                options.ClientId = "interactive";//这个是该客户端应用在IdentityServer服务器上的唯一标识,也就是对应Client类的ClientId属性
                options.ClientSecret = "49C1A7E1-0C79-4A89-A3D6-A37998FB86B0";//这个是客户端应用的秘钥,也就是对应Client类的ClientSecrets属性所包含的值。
                //表示用户在IdentityServer登录成功后,认证服务器要返回给客户端应用的是授权码。
                //客户端应用根据获取到的授权码去再去IdentityServer认证服务器请求IdentityToken和AccessToken.
                //如果指定为 id_token code 那么identity token登录成功后直接返回给客户端应用,而不是通过接口去请求获取。
                options.ResponseType = "code";

                //这里去请求scope2这个api的访问权限,
                //这里只能添加客户端被允许访问的api,
                //如果请求无访问权限的api则会失败.
                options.Scope.Add("scope2");
                //options.Scope.Add("scope1");

                //这里去请求获取用户信息的权限,profile中包含了多个用户基础信息项目。
                options.Scope.Add("profile");
                //设置为true表示通过IdentityServer认证服务器的UserInfoEndPoint接口获取用户的信息,
                //客户端应用收到IdentityToken后,通过IdentityToken去请求UserInfoEndPoint接口来获取用于的基本信息
                options.GetClaimsFromUserInfoEndpoint = true;

                options.SaveTokens = true;//表示将Token保存到浏览器cookie中。
            });
通过以上两种方法中的任何一种,我们可以看到profile这个IdentityResource中包含的UserClaim且在用户中有定义的用户信息都被包含到了客户端应用存储本地登录信息的Cookie中去了。
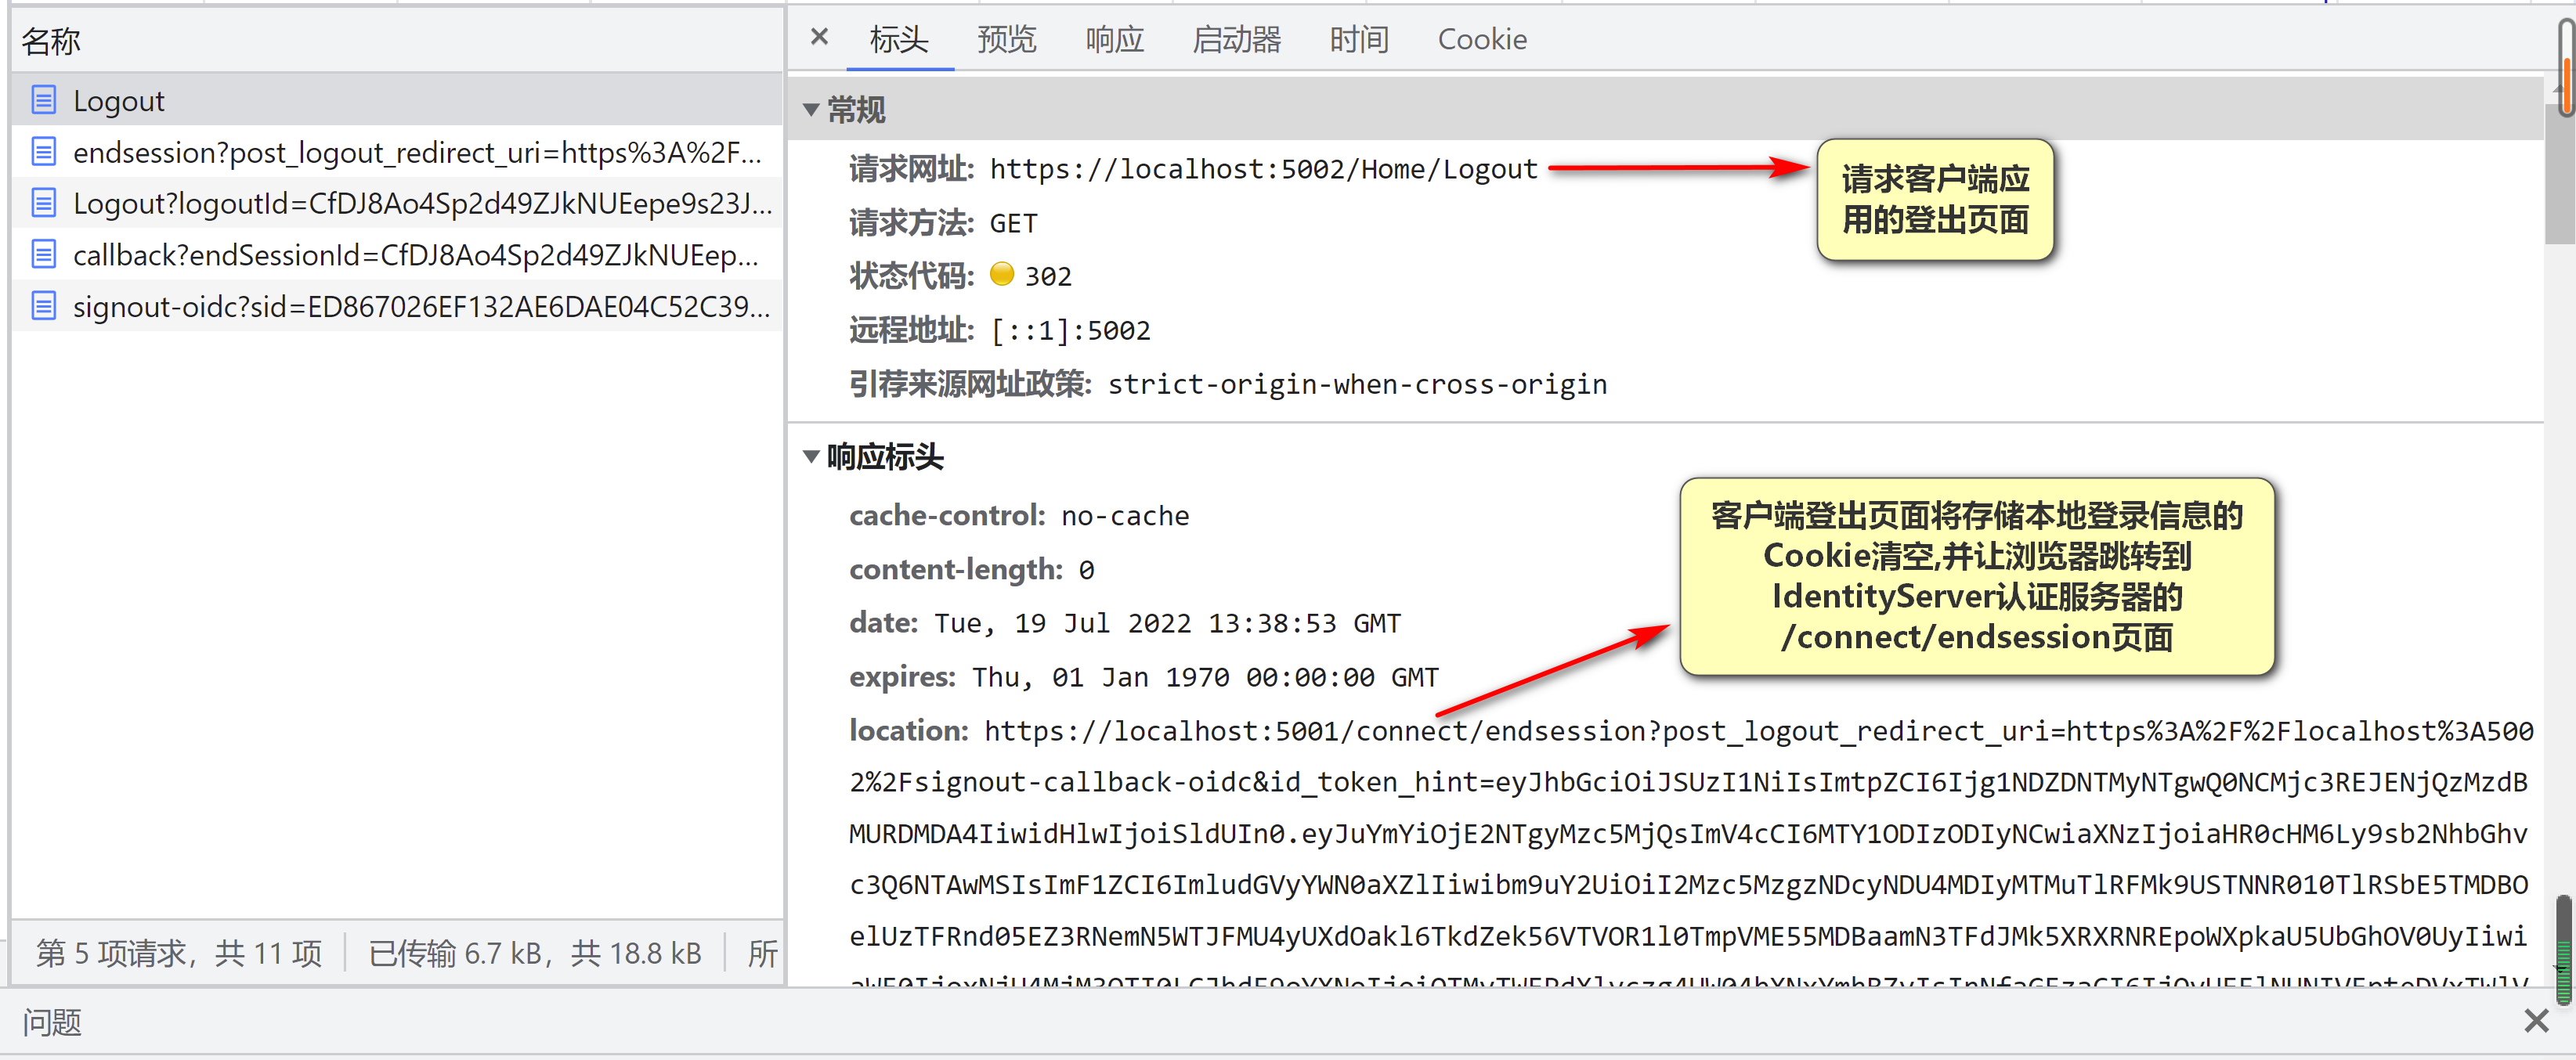
上面我们说到,如果要退出客户端应用,是通过删除客户端应用中名为:.AspNetCore.Cookies 的Cookie来退出本地登录,接下来我们用代码去实现退出客户端应用的本地登录功能,并且自动退出IdentityServer认证服务器。
创建API资源项目
这里我们先约定好,创建的API站点的访问地址为:https://localhot:5003
添加项目名为Api的项目,这个项目主要是定义API,提供给客户端应用访问,不过前提是,客户端应用必须通过IdentityServer认证服务器认证授权之后才允许访问
然后添加名为:Microsoft.AspNetCore.Authentication.JwtBearer 的这个Nuget包引用,该包主要是用于检验客户端发送过来的AccessToken是否有效,如果有效,则检测客户端应用
请求的接口名称是否具有访问权限,需要注意的是:检查客户端应用是否需具有访问权限的逻辑是由API资源服务器自己实现的。
打开API资源服务器项目下的Startup.cs文件
ConfigureServices定义如下:
public void ConfigureServices(IServiceCollection services)
        {
            services.AddControllersWithViews();
            services.AddAuthentication("Bearer").AddJwtBearer("Bearer", options =>
           {
               //Identity认证授权服务器的地址。
               options.Authority = "https://localhost:5001";
               //会去Identity认证服务器拉取Jwt Token解密的公钥,然后去校验客户端发送过来的AccessToken是否有效
               options.TokenValidationParameters = new TokenValidationParameters
               {
                   ValidateAudience = false
               };
           });
            services.AddAuthorization(options =>
            {
                //表示访问api资源服务器上的资源时需要有scope2这个api的访问权限才可以访问。
                options.AddPolicy("api", authorizationPolicyBuilder => {
                    authorizationPolicyBuilder.RequireClaim("scope", "scope2");
                });
            });
        }
Configure方法定义如下:
        // This method gets called by the runtime. Use this method to configure the HTTP request pipeline.
        public void Configure(IApplicationBuilder app, IWebHostEnvironment env)
        {
            if (env.IsDevelopment())
            {
                app.UseDeveloperExceptionPage();
            }
            else
            {
                app.UseExceptionHandler("/Home/Error");
                // The default HSTS value is 30 days. You may want to change this for production scenarios, see https://aka.ms/aspnetcore-hsts.
                app.UseHsts();
            }
            app.UseHttpsRedirection();
            app.UseStaticFiles();

            app.UseRouting();

            //记得启用认证方案。
            app.UseAuthentication();
            app.UseAuthorization();

            app.UseEndpoints(endpoints =>
            {
                endpoints.MapControllerRoute(
                    name: "default",
                    pattern: "{controller=Home}/{action=Index}/{id?}");
            });
        }
在Api资源服务器项目中定义名为:IdentityController的Controller,并定义以下Api.
    public class IdentityController : ControllerBase
    {
        /// <summary>
        /// 定义访问路径为:https://localhost:5003/identity的接口,给客户端应用访问测试。
        /// </summary>
        /// <returns></returns>
        [Route("Identity")]
        [Authorize]
        [HttpGet]
        public IActionResult Get()
        {
            return new JsonResult(from c in User.Claims select new { c.Type, c.Value });
        }
    }
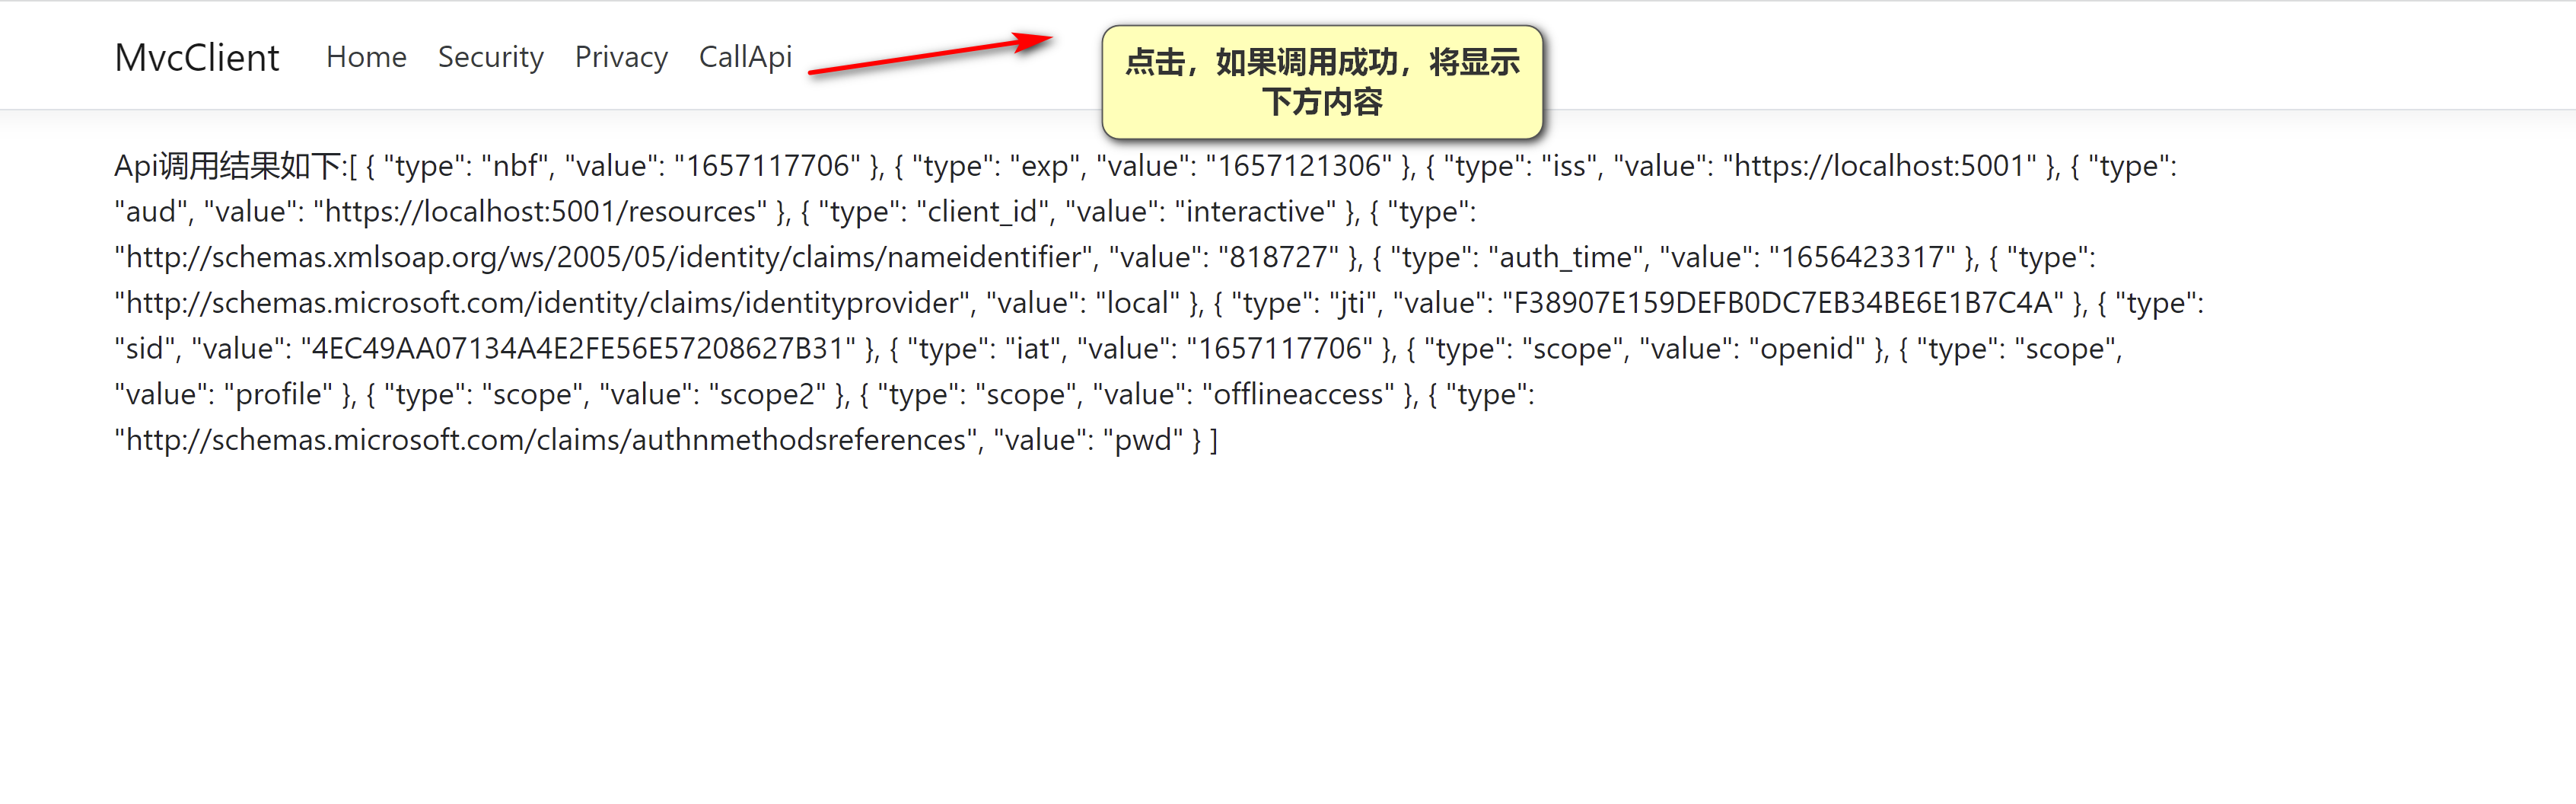
做完以上步骤后,在客户端应用的HomeController中定义
        public async Task<IActionResult> CallApi()
        {
            //客户端应用配置这边,记得设置SaveTokens=true.
            var accessToken = await HttpContext.GetTokenAsync("access_token");

            //生产环境中不要这么用,会造成Socket连接资源耗尽。
            var client = new HttpClient();
            client.DefaultRequestHeaders.Authorization = new AuthenticationHeaderValue("Bearer", accessToken);
            //这里请求的是API资源服务器的接口地址。
            var content = await client.GetStringAsync("https://localhost:5003/identity");

            ViewBag.Json = JArray.Parse(content).ToString();
            return View("json");
        }
然后分别启动IdentityServer认证服务器,客户端应用、Api资源服务器,
然后再客户端应用点击CallApi来进行测试对API资源服务器的调用。
限于文章篇幅,我们今天先分享到这里,后续再跟大家分享 如何实现单点登出、认证授权数据持久化等功能,以及一些原理性的东西。


 聊聊 asp.net core 认证和授权
2022-09-06
聊聊 asp.net core 认证和授权
2022-09-06
 IdentityServer4 单点登出实现
2022-07-26
IdentityServer4 单点登出实现
2022-07-26
 asp.net core + jenkins 实现自动化发布
2022-04-08
asp.net core + jenkins 实现自动化发布
2022-04-08
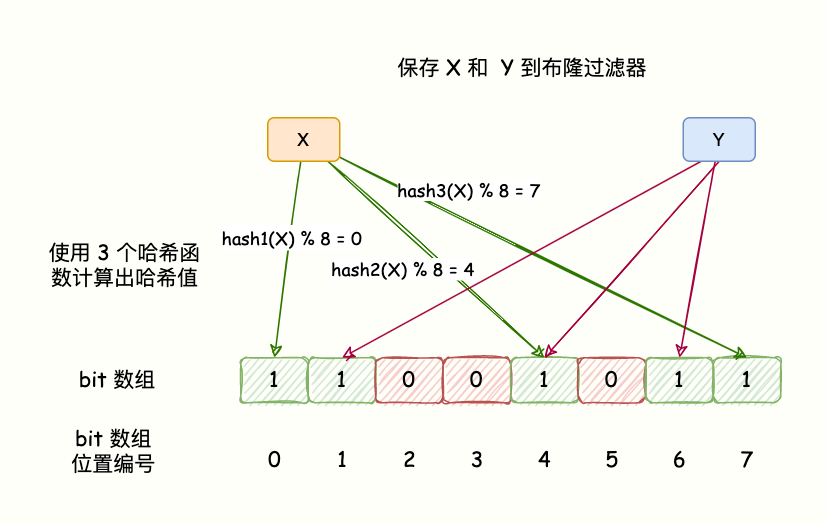 硬核 | Redis 布隆(Bloom Filter)过滤器原理与实战
2022-03-25
硬核 | Redis 布隆(Bloom Filter)过滤器原理与实战
2022-03-25
 Redis主从、哨兵、 Cluster集群一锅端!
2022-03-22
Redis主从、哨兵、 Cluster集群一锅端!
2022-03-22
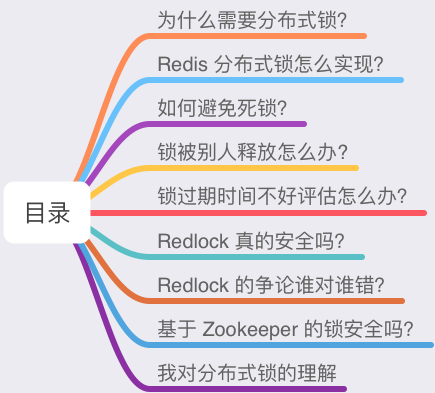 深度剖析:Redis分布式锁到底安全吗?看完这篇文章彻底懂了
2022-03-10
深度剖析:Redis分布式锁到底安全吗?看完这篇文章彻底懂了
2022-03-10
记一次 .NET 某妇产医院 WPF内存溢出分析 2021-12-28
记一次 .NET 某市附属医院 Web程序 偶发性CPU爆高分析 2021-12-28
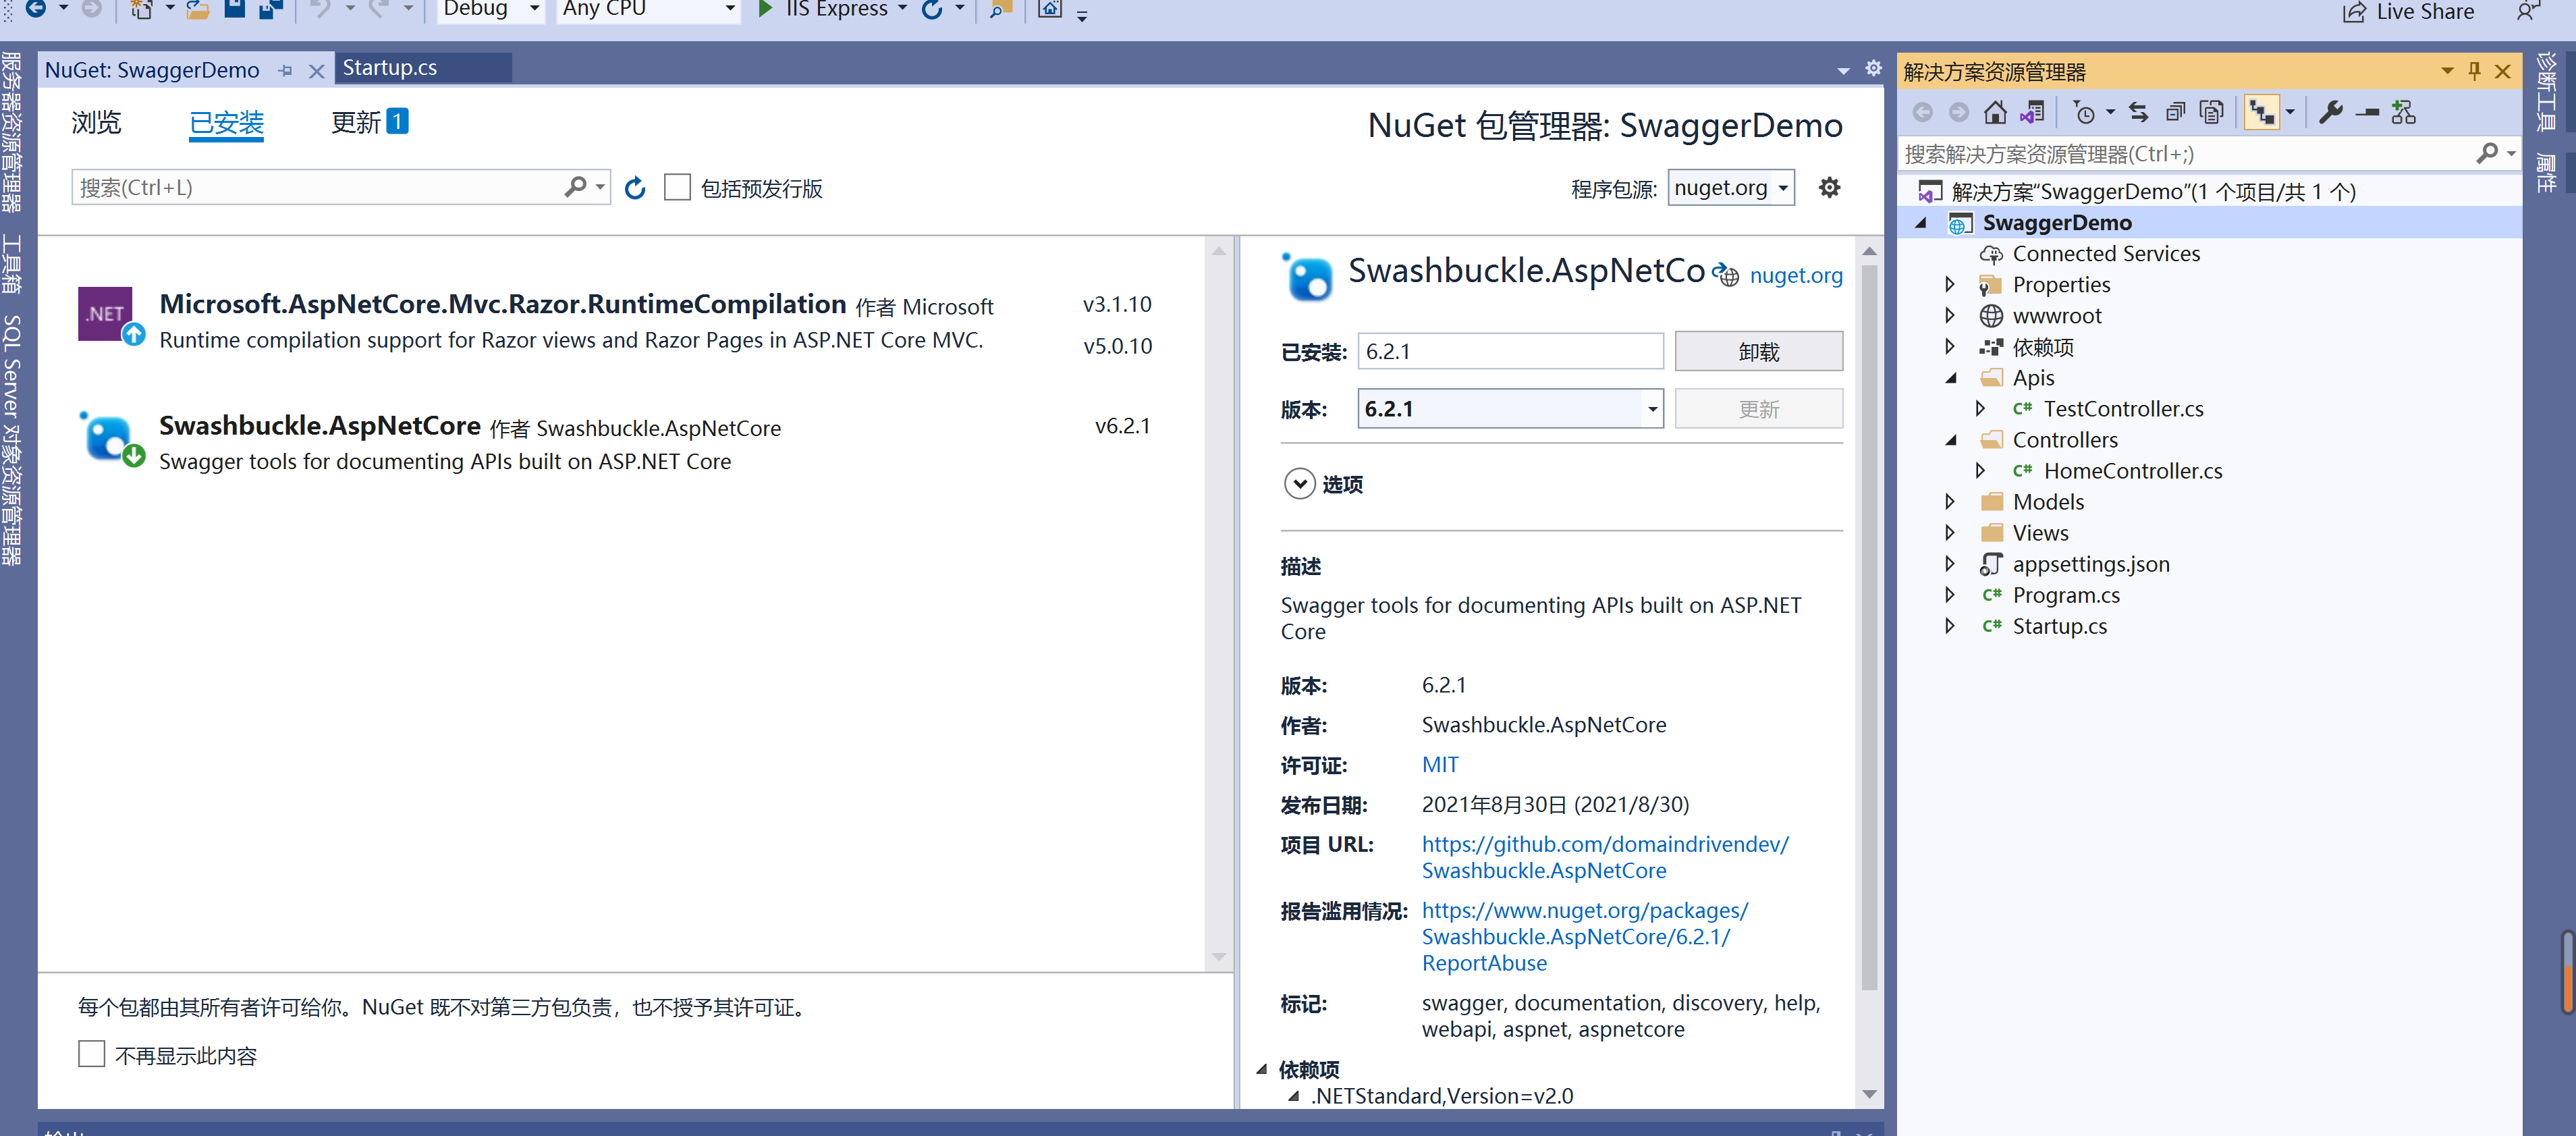 asp.net core 集成swagger ui
2021-10-07
asp.net core 集成swagger ui
2021-10-07